

The first step in replacing a mobile home subfloor is to identify the signs of damage. Soft spots or sagging floors are common indicators of subfloor damage. Once you have identified these signs, it’s essential to take prompt action. This will help to prevent further damage and ensure the safety of your home. In this article Replacing Mobile Home Subfloor: A step by step guide we will discuss all the steps that are important to replacing your mobile home subfloor.
Replacing Mobile Home Subfloor
Mobile home subflooring is a crucial element that provides a solid foundation for the floor covering. However, due to various reasons such as water leaks, pests, or wear and tear, mobile home subfloors can become damaged over time. In this article, we will discuss how to replace subflooring in a mobile home.
To replace a mobile home subfloor, you need to remove the old subfloor carefully. This process involves cutting out sections of the damaged flooring and removing any nails or screws that hold it in place. Next, inspect the joists and framing for any damage or rotting caused by water leaks or pests.
After repairing any damages found on the joists and framing, it’s time to install a new subfloor using appropriate materials and techniques. There are different types of subfloors available for use in mobile homes such as plywood or oriented strand board (OSB). Plywood is an excellent choice if you’re looking for durability while OSB is more affordable but less durable than plywood.
When installing a new subfloor, make sure it fits snugly against all walls and there are no gaps between them. Also, ensure that each piece is nailed down securely with galvanized nails or screws at least 6 inches apart around its perimeter.
Signs Your Mobile Home Floor Needs Repair or Replacement
Mobile homes are an affordable housing option for many people. However, they require regular maintenance and repair to keep them in good condition. One of the most important parts of a mobile home is the floor. The floor provides structural support and insulation for the home, and it’s essential to keep it in good condition. In this section, we’ll discuss some signs that your mobile home floor needs repair or replacement.
Water Damage on Walls or Ceiling
One of the most common signs that your mobile home floor needs repair or replacement is water damage on the walls or ceiling. If you notice water stains or discoloration on your walls or ceiling, it could indicate a roofing issue that may require floor replacement. Water can seep through cracks in the roof and damage the subflooring underneath, causing structural damage over time.
Check out our article Stains on Ceilings 9+ Ways to Fix This
Dampness or Mold Growth
Dampness or mold growth on the walls or floor can be a sign of water damage and may require repair or replacement. If you notice a musty smell in your home this could be a problem. It could be a sign of mold growth caused by moisture from leaks in your roof, windows, doors, plumbing fixtures, etc. Mold spores can cause respiratory problems and allergies if left untreated.
Read more on our article Mold Roof.
Our article on Siding Mildew might help to prevent allergies as well.
Soft Spots or Sagging Floors: Replacing Mobile Home Subfloor
Another sign that your mobile home floor needs repair is soft spots or sagging floors. Soft spots are areas where the subflooring has weakened due to water damage. This can cause rotting wood, termites’ infestation, etc., . This in turn will cause them to feel spongy when stepped on. Sagging floors occur when there’s structural damage underneath due to heavy objects being placed on them for extended periods.
Read our article How Much Weight Can A Mobile Home Floor Hold for more information.
Peeling Paint/Wallpaper
Peeling paint/wallpaper on the walls can be a sign of leaks or moisture issues that may require repair. When moisture enters through cracks in your roof/walls/flooring, it can cause the paint or wallpaper to peel off. If left untreated, this can lead to more significant problems like mold growth and structural damage.
Factors Affecting the Cost of Replacing Mobile Home Subfloor
Costs and energy costs are two of the most significant factors that influence the decision to repair or replace floors in a mobile home. Several factors can affect the overall cost, including the extent of damage, type of materials needed, and hiring a professional contractor. In this section, we will discuss some key points that can help you understand these factors.
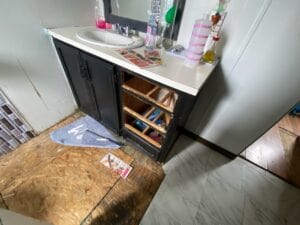
(Boards over soft spots in the floor like pictured below can help until you can afford to repair the spot.)
Extent of Damage
The cost to fix mobile home floors per square foot depends on the extent of damage. The more extensive the damage, the higher the cost will be. For instance, if there is only minor water damage on one part of your flooring, it may only require patching up or sanding down to remove any unevenness. However, if there is severe water damage throughout your entire floor system, it may require complete replacement.
Hiring a Professional Contractor
While hiring a professional contractor can increase overall costs for fixing floors in a mobile home, it ensures that the job is done correctly and safely. A professional contractor has experience dealing with various types of subfloor issues and knows how to identify potential problems before they become major concerns. They also have access to specialized tools and equipment necessary for repairing or replacing subfloors efficiently.
Energy Costs
The condition of your subfloor can significantly impact energy costs as air leaks can cause heating and cooling systems to work harder and use more energy. If you notice an increase in your energy bills over time or feel drafts coming from beneath your feet when walking around inside your mobile home, it could be due to air leaks caused by damaged subfloors.
Read our article on The Average Electric Bill for a Mobile Home.
Additional Repairs
If additional repairs are needed when replacing subfloors in a mobile home such as plumbing or electrical issues, it can further increase overall costs. Before starting any work on your flooring system, ensure that all other areas within your mobile home are inspected for potential problems.
Choosing High-Quality Materials
Choosing high-quality materials for your new subfloor can increase the upfront cost but can save money in the long run by reducing the need for future repairs. High-quality materials are more durable and resistant to wear and tear, ensuring that your subfloor lasts longer.
DIY Repairs
While DIY repairs may seem like a cost-effective option, inexperienced individuals may end up causing more damage and increasing overall costs. It is always best to hire a professional contractor to ensure that your flooring system is repaired or replaced correctly and safely.
DIY Tips for Replacing Mobile Home SubFloor
Assessing the Condition of Your Mobile Home Floor
Before starting a DIY project to replace your mobile home floor, it’s crucial to assess the condition of your current floor. You should check for any signs of water damage, soft spots, or areas that are uneven. If you notice any of these issues, it’s essential to address them before replacing the entire floor.
One way to determine if there is water damage is by checking for mold or mildew growth. You can also use a moisture meter to detect any excess moisture in the subfloor. If there are soft spots in certain areas, you may need to remove those sections and replace them with new wood.
Choosing the Right Type of Mobile Home Flooring Material
When choosing a flooring material for your mobile home, you should consider factors such as durability, cost-effectiveness, and ease of installation. Some popular options include vinyl planks, laminate flooring, and carpet tiles.
Vinyl planks are an affordable option that is easy to install and maintain. They come in various styles and colors that mimic the look of hardwood floors. Laminate flooring is another budget-friendly option that offers similar benefits as vinyl planks but has a more natural wood-like appearance.
Carpet tiles are ideal if you’re looking for a comfortable and cozy feel underfoot. They’re easy to install and come in various patterns and colors that allow you to customize your space.
Preparing Tools and Equipment for DIY Mobile Home Floor Replacement
Replacing a mobile home floor requires specific tools such as circular saws, jigsaws, pry bars, hammers, drill bits, screws/nails among others. It’s essential to have all necessary tools ready before starting work on your mobile home floor replacement project.
Removing Furniture and Appliances from Room
To make it easier to work on your mobile home floor without damaging furniture or appliances around it; it would be best if you removed everything from the room beforehand. This also helps to free up space and allows you to move around more freely.
Following Safety Precautions When Working on Mobile Home Floor
Safety should always be a top priority when working on your mobile home floor. You should wear protective gear such as gloves, goggles, and masks to prevent injury or exposure to harmful dust and debris. It’s crucial to turn off all electrical power sources in the room before starting work.
Taking Your Time with Mobile Home Floor Replacement
Replacing a mobile home floor is not a quick project; it requires time and patience. Rushing through any of the steps can lead to mistakes that may affect the final outcome. Therefore you need to take your time, follow each step carefully, and ensure that everything is done correctly.
DIY projects are an excellent way of saving money while also learning new skills. Replacing your mobile home floor may seem like a daunting task but following these tips will make the process easier for you. Remember always to assess the condition of your current floor before starting any work, choose the right flooring material for your budget and preferences, prepare all necessary tools beforehand, remove furniture from the room, follow safety precautions when working on your mobile home floor and take your time with each step of the process.
Tools and Materials Needed for Replacing Subflooring in a Mobile Home
Specialty Tools and Materials Needed for Replacing Subflooring in a Mobile Home
Replacing subflooring in a mobile home can be a daunting task, but with the right tools and materials, it can be done efficiently and effectively. A range of specialty tools is required for this project, including a circular saw, reciprocating saw, jigsaw, hammer, and pry bar. It is also important to have the necessary materials on hand before beginning the project.
The most important tool needed for replacing subflooring in a mobile home is a circular saw. This tool allows you to make precise cuts through the old subflooring to remove damaged areas. When selecting a circular saw, it is essential to choose one with an adjustable depth setting that matches the thickness of your subflooring material.
Another essential tool for this project is a reciprocating saw. This type of saw allows you to cut through nails or screws that may be holding the old subfloor in place without damaging surrounding areas. A jigsaw can also be useful for cutting out intricate shapes or curves in the new subfloor material.
In addition to cutting tools, having a hammer and pry bar on hand can help with removing damaged sections of subflooring. These tools are especially useful when dealing with stubborn nails or screws that are difficult to remove.
Particle board and plywood are two common options. Particle board is an affordable choice that works well as an underlayment layer between the main flooring material and joists. Plywood is another popular option due to its strength and durability.
It’s important to have a comprehensive material list before starting this project so that you don’t run into any delays or setbacks midway through. The type and amount of materials needed will depend on the size of the area that needs to be replaced.
How to Determine the Size of the Repair Area and Level the New Subfloor Area
Measuring the Repair Area and Leveling the New Subfloor
Before replacing subfloors in a mobile home, it is essential to determine the size of the repair area. Measuring the square footage of the area that needs to be repaired will help you determine how much subfloor material you need. To measure accurately, start by drawing a rough sketch of the room or area that needs repair. Measure each wall’s length and multiply them to get your total square footage.
Once you have determined how much subfloor material you need, it’s time to level the new subfloor area. Use a level tool to check if there are any high or low spots on your floor. If there are any uneven areas, make necessary adjustments using shims or leveling compound to ensure a flat surface.
Removing Damaged Subfloor Material
Before installing new subfloor material, remove any damaged or rotten subfloor material within the repair area. This step is crucial as it ensures that your new subfloors will last longer and remain structurally sound. Use a pry bar and hammer to remove any damaged wood carefully.
Cutting and Securing New Subfloor Material
After removing damaged wood, cut your new subfloor material to fit precisely into the repair area without leaving gaps or overhangs. You can use a circular saw for this task; however, be careful not to damage surrounding areas while cutting.
Once you’ve cut your new subfloor material, secure it firmly in place using screws or nails ensuring that it is level with surrounding floors. It’s best practice always to screw down instead of nailing since screws provide better holding power than nails do.
Step-by-Step Guide for Removing Trim, Floor Covering, and Cutting Out Subflooring
Removing Trim and Floor Covering
The first step in replacing subfloors in mobile homes is to remove the trim and floor covering. This is an essential part of the process as it exposes the subfloor, allowing you to see the extent of the damage. To do this, use a pry bar or a flathead screwdriver to gently lift and remove any baseboards or quarter round trim around the perimeter of the room. Next, carefully pull up any carpet, vinyl, or laminate flooring that may be covering the subfloor. Be sure to wear gloves and protective eyewear during this process as there may be sharp objects hidden beneath.
Cutting Out Subflooring
Once you have exposed the subfloor, it’s time to cut out any damaged sections using a circular saw. Start by making a series of cuts along the length of each damaged piece of subflooring, then use a hammer and chisel or reciprocating saw to break apart the wood into manageable pieces. If your mobile home has particle board subfloors with plywood edges, use a saw or knife to cut through both materials along their edges so that they can be removed separately.
Removing Pipes and Nails
After cutting out all damaged pieces of subflooring, it’s important to check for any pipes or nails that may still be sticking out from under the remaining wood. Use pliers or a wrench to remove any nails that are protruding from joists or support beams. If there are pipes running underneath your bathroom floor, make sure they are disconnected before proceeding with cutting out the subfloor.
Repeat Process for Each Section
Repeat these steps for each section of damaged subfloor until all affected areas have been removed completely. It’s crucial to take your time during this process as rushing could lead to further damage down the line. Once all damaged sections have been removed, inspect the joists and support beams below for signs of rotting or other damage. If any issues are found, they should be addressed before installing new subflooring.
Replacing Missing Subfloor Sections with New Material and Adding Insulation
New Subflooring: Replacing Missing Sections and Adding Insulation
Removing old subfloor sections and installing new material is a necessary process when replacing subfloors in mobile homes. This replacement process involves taking out the old subfloor sections, cleaning up the area, and then installing new subflooring material. In order to ensure an even flooring surface, it’s important that the thickness of the new subfloor matches that of the old one.
When replacing missing subfloor sections with new material, it’s also important to consider adding insulation between the old and new layers. This can help prevent warping and infringement issues from occurring over time. By including insulation in this way, you can help to maintain a consistent temperature within your home while also reducing energy costs.
Subfloors: The Importance of Material Choice
Choosing the right subfloor material for your mobile home is crucial when considering replacements or upgrades. There are several different types of materials available on the market today, each with their own set of pros and cons. Some popular options include plywood, OSB (oriented strand board), particleboard, and cement board.
Plywood is a common choice for mobile home subfloors due to its durability and strength. It’s also relatively easy to install compared to other materials like OSB or particleboard. However, plywood can be more expensive than other options, which may make it less feasible for those on a tight budget.
OSB is another popular option for mobile home subfloors due to its affordability and ease of installation. It’s made from wood chips glued together under high pressure, making it a strong and durable choice for flooring applications. However, some people may find that OSB tends to swell or warp over time if not properly sealed or maintained.
Particleboard is often used as an alternative to plywood due to its lower cost. However, it’s generally not as strong or durable as plywood or OSB and may not hold up well under heavy foot traffic or moisture exposure.
Cement board is a newer option for mobile home subfloors that offers excellent durability and resistance to moisture. It’s also fire-resistant, making it a safe choice for homes in wildfire-prone areas. However, cement board can be more difficult to install than other materials and may require professional assistance.
Insulation: Improving Energy Efficiency
In addition to adding insulation between the old and new subfloor layers, including a layer of insulation before installing new flooring and floor covering can improve energy efficiency within your home. This can help reduce heating and cooling costs over time while also providing additional soundproofing benefits.
There are several different types of insulation available on the market today, including fiberglass batts, spray foam, blown-in cellulose, and rigid foam boards. Each type has its own set of pros and cons depending on your specific needs and budget.
Fiberglass batts are a common choice due to their affordability and ease of installation. They’re made from spun glass fibers that are typically installed between wall studs or floor joists using staples or adhesive tape.
Spray foam insulation is another popular option for mobile homes due to its excellent thermal performance properties. It’s applied as a liquid that expands into a solid foam once cured, providing an air-tight seal that helps prevent drafts and heat loss.
Blown-in cellulose is made from recycled paper products that have been treated with fire retardants. It’s blown into wall cavities or attic spaces using specialized equipment, making it an efficient way to add insulation without having to tear down walls or ceilings.
Rigid foam boards are another option for mobile home insulation that offer excellent thermal performance properties. They’re typically made from polystyrene or polyisocyanurate materials and come in various thicknesses depending on your specific needs.
Attaching Floor Joist Supports and Laying the New Subflooring Down
Attach Floor Joist Supports to Perimeter Joists
Before laying down the new subflooring, it is important to attach floor joist supports to perimeter joists. This step ensures that the new flooring will have a sturdy foundation and be able to support weight without sagging or buckling. The process of attaching floor joist supports involves measuring and cutting pieces of wood to fit between the existing perimeter joists and the floor joists. These pieces are then secured in place using nails or screws.
It is important to ensure that the floor joist supports are level and flush with the existing perimeter joists. Any inconsistencies in height or alignment can result in an uneven subfloor, which can cause problems when installing finished flooring later on. It is important to use high-quality materials for this step, as inferior materials can compromise the structural integrity of the entire flooring system.
Lay New Subflooring Down Over the Floor Joists
Once the floor joist supports are securely in place, it is time to lay down the new subflooring over the floor joists. This involves measuring and cutting sheets of plywood or oriented strand board (OSB) to fit between each pair of neighboring floor joists. The sheets should be cut precisely so that they fit snugly against one another without any gaps.
It is also important to install cross support for added strength and support at this stage. Cross support typically consists of additional pieces of wood that run perpendicular to the direction of the floor joists. These pieces help distribute weight more evenly across the subflooring and prevent sagging or buckling over time.
Ensure Proper Fit and Depth for New Cross Support
When installing cross support, it is essential to ensure that they fit properly and are at the correct depth relative to surrounding components such as insulation or ductwork. Improperly installed cross support can cause damage over time due to shifting weight distribution.
To avoid these issues, it is important to measure carefully and use high-quality materials. It may be necessary to make adjustments or modifications to surrounding components in order to accommodate the new cross support.
Use Glue and Hangers for Secure Subfloor Layers
Finally, it is important to secure the new subfloor layers in place using glue and hangers. This helps ensure that the subflooring remains level and sturdy over time, even with heavy foot traffic or other weight-bearing activities.
To apply glue, simply spread a thin layer of adhesive onto the surface of each sheet of plywood or OSB before laying it down on top of the floor joists. Then, use hangers or other fasteners to secure each sheet in place. It is important to work carefully and methodically during this step in order to avoid mistakes that can compromise the integrity of the entire flooring system.
Replacing Mobile Home Subfloors is Achievable with Proper Planning and Execution
Replacing mobile home subfloors may seem daunting at first, but with proper planning and execution, it is achievable. By following the DIY tips outlined in this post, you can save money on costly repairs and ensure that your mobile home remains safe and structurally sound for years to come.
It’s important to be aware of the signs that your mobile home floor needs repair or replacement, such as soft spots or sagging floors. Factors like the size of the repair area and the type of materials needed will influence the cost of fixing your floors. However, by doing it yourself, you can significantly reduce these costs.
To get started, make sure you have all the necessary tools and materials on hand. This includes everything from a circular saw to safety glasses. Once you’ve determined the size of the repair area and leveled out the new subfloor area, it’s time to start removing trim and cutting out old subflooring.
As you replace missing subfloor sections with new material, don’t forget to add insulation for extra protection against moisture and cold temperatures. Attaching floor joist supports is crucial for ensuring that your new subflooring is sturdy enough to support foot traffic.
Through each step of this process, it’s important to maintain an authoritative tone of voice while also writing conversationally. Varying sentence types and structures will keep readers engaged while emphasizing key points through varied sentence emphasis ensures that they understand what steps are most important.
Replacing Mobile Home Subfloor: Conclusion
In replacing mobile home subfloor whether you do it yourself of hire it done, its important to do it right. You don’t want to replace the subflooring incorrectly and have issues down the road. If you do have a soft subfloor fixing it quickly is important. The rotted area can spread and make for a bigger project if left unattended.
FAQ’s: Replacing Mobile Home Subfloor
What subfloor is best for mobile homes?
For mobile homes, plywood subflooring is commonly used due to its durability and stability. It’s essential to choose a subfloor material that can withstand the specific conditions and requirements of mobile homes, which may include exposure to movement and potential moisture issues.
How much does it cost to replace a whole subfloor?
The cost of replacing a whole subfloor can vary significantly depending on factors such as the size of the area, the type of subfloor material, and whether you hire a professional. On average, it can range from a few thousand dollars to several thousand dollars.
How difficult is it to replace a subfloor?
Replacing a subfloor can be a challenging and labor-intensive task, requiring skills in demolition, carpentry, and flooring installation. The difficulty level depends on the extent of the damage and the complexity of the project, making it a job that often requires professional expertise.
Can you lay new subfloor over rotted subfloor?
It’s generally not recommended to lay a new subfloor over a rotted or damaged subfloor. It’s crucial to address and repair any underlying issues, such as rot or structural damage, before installing a new subfloor to ensure a stable and long-lasting foundation for your flooring.
You might also be interested in our article Sell My Mobile Home .