

Do you own a mobile home and find yourself dealing with frustrating plumbing issues? You’re not alone! In this article Fixing Mobile Home Plumbing we discuss all things plumbing and your mobile home.
Fixing Mobile Home Plumbing
Mobile home plumbing problems can be a headache for many homeowners. From leaky faucets to clogged drains, these issues can disrupt your daily life and leave you feeling overwhelmed. Understanding the unique challenges of mobile home plumbing is crucial in tackling these problems effectively.
Mobile homes often face specific plumbing challenges due to their construction and design. The materials used, such as flexible piping and smaller fixtures, can contribute to frequent issues. Leaks, low water pressure, and sewer line backups are common occurrences that mobile homeowners encounter.
Preventing these plumbing problems requires proactive maintenance and regular inspections. By addressing potential issues early on, you can save yourself from costly repairs down the line. Neglecting maintenance can lead to more severe consequences like water damage or even structural issues.
Living with persistent plumbing problems can be a hassle, affecting your daily routine and overall comfort in your mobile home. Whether it’s dealing with slow drainage or constantly running toilets, these issues demand prompt attention.
So let’s dive in!
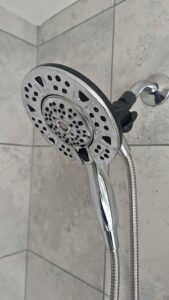
Identifying and Addressing Shower Head Leaks
Signs of a Shower Head Leak
Dripping water from the shower head even when it’s turned off
Puddles forming on the bathroom floor after taking a shower
Decreased water pressure during showers
Mold or mildew growth around the shower head or in adjacent areas
Steps to Fix a Leaking Shower Head in a Mobile Home
Turn off the water supply: Locate the shut-off valve for your shower and turn it clockwise to stop the flow of water.
Remove the shower head: Unscrew the shower head by turning it counterclockwise. Use a wrench if necessary, but be careful not to damage any surrounding fixtures.
Inspect the components: Check for any cracks, worn-out washers, or damaged threads on both the shower head and pipe.
Clean and replace washers: If there are no visible issues with the components, remove any old washers and clean them thoroughly. Replace them with new ones if necessary.
Apply plumber’s tape: Wrap plumber’s tape clockwise around the threaded part of the pipe before screwing the shower head back on. This helps create a watertight seal.
Reattach the shower head: Screw the shower head back onto the pipe, tightening it securely but not excessively.
Importance of Using Plumber’s Tape During Repair
Prevents leaks by creating a tight seal between threaded connections
Protects against corrosion and rust formation on metal components
Easy to apply and inexpensive solution for preventing future leaks
Tips for Preventing Future Leaks in Shower Heads
Regularly inspect your shower heads for signs of wear or damage
Clean mineral deposits from your shower heads periodically to prevent clogs that can lead to leaks
Avoid overtightening when installing or removing your shower heads as this can cause damage to the threads
Consider using a water pressure regulator if your mobile home has high water pressure, as excessive pressure can lead to leaks
By following these steps and tips, you can easily identify and address shower head leaks in your mobile home. Taking prompt action to fix any leaks will not only save you from unnecessary water wastage but also prevent potential damage to your bathroom and surrounding areas. Remember, regular maintenance and care are key to ensuring the longevity of your plumbing system.
So if you notice any signs of a shower head leak, don’t delay – grab your tools and get to work fixing it! Your wallet and the environment will thank you.
You might also be interested in our article Mobile Home Water Shutoff Valve
Inspecting Mobile Home Plumbing System Twice a Year:
Benefits of regular inspections for mobile home plumbing systems
Regular inspections of your mobile home’s plumbing system can help you catch potential problems before they turn into costly disasters. By taking the time to inspect your plumbing twice a year, you can ensure that everything is in working order and prevent any major issues from arising.
Here are some key benefits of conducting routine inspections:
Preventative maintenance: Regular inspections allow you to identify small issues early on and address them promptly. This helps prevent larger problems down the line, saving you both time and money.
Increased lifespan: By catching and fixing minor leaks or damage, you can extend the lifespan of your plumbing system. Regular maintenance ensures that your pipes, fixtures, and connections remain in good condition for years to come.
Improved efficiency: Inspecting your plumbing system allows you to identify any inefficiencies or areas where water may be wasted. By addressing these issues, you can improve the overall efficiency of your system and reduce water consumption.
Peace of mind: Knowing that your mobile home’s plumbing has been thoroughly inspected gives you peace of mind. You can rest easy knowing that there are no hidden leaks or potential problems lurking beneath the surface.
Key areas to check during a routine inspection
When inspecting your mobile home’s plumbing system, it’s important to pay attention to specific areas that are prone to issues. Here are some key areas to focus on:
Pipes: Examine all visible pipes for signs of corrosion, leaks, or damage. Look for discoloration, rust spots, or bulges in the pipes.
Fixtures: Check faucets, showers, toilets, and other fixtures for any leaks or drips. Ensure that they are functioning properly without any unusual noises or slow drainage.
Water heater: Inspect the water heater for any signs of leaks or rust. Check the temperature and pressure relief valve to ensure it is working correctly.
Drainage system: Test all drains in your mobile home to ensure they are flowing properly. Look for any signs of clogs, slow drainage, or foul odors.
How to identify potential issues before they become major problems
During your inspection, keep an eye out for any red flags that may indicate potential plumbing problems. Here are some signs to watch for:
Water stains: Look for water stains on walls, ceilings, or floors, as these can indicate a hidden leak.
Low water pressure: If you notice a decrease in water pressure in certain areas of your mobile home, it could be a sign of a blockage or pipe issue.
Unusual sounds: Pay attention to any strange noises coming from your plumbing system, such as banging or gurgling sounds. These could signal underlying issues.
High water bills: A sudden increase in your water bill without any changes in usage may point to a hidden leak.
Dealing With Clogged Pressure Reducing Valves:
Understanding the role and importance of pressure reducing valves in mobile homes
Pressure reducing valves play a crucial role in maintaining the optimal water pressure in your mobile home’s plumbing system. These valves are designed to regulate and reduce the incoming water pressure from the main supply line, ensuring it doesn’t exceed safe levels. Without a properly functioning pressure reducing valve, you may experience various plumbing problems that can be costly to fix.
Signs indicating a clogged valve and its impact on water flow
When a pressure reducing valve becomes clogged, it can lead to several noticeable signs. One common indicator is reduced water flow throughout your mobile home. You might notice that faucets and showerheads produce weak streams or take longer to fill up containers. Another sign is an increase in water pressure, which may cause pipes to rattle or even burst if left unaddressed.
DIY methods to clear clogs in pressure reducing valves
If you suspect your pressure reducing valve is clogged, there are some do-it-yourself methods you can try before calling a professional plumber. Here are a few options:
Flush the valve: Turn off the main water supply and relieve any remaining pressure by opening faucets. Remove the bonnet cap of the valve and use a brush or cloth to clean out any debris or sediment inside.
Soak in vinegar solution: If flushing alone doesn’t solve the issue, create a vinegar solution by mixing equal parts white vinegar and warm water. Submerge the valve components in this solution for about 30 minutes before rinsing thoroughly.
Replace faulty parts: In some cases, specific parts within the valve may be causing the blockage. Check for any damaged or worn-out components such as rubber seals or diaphragms and replace them accordingly.
When it’s necessary to call a professional plumber
While attempting DIY fixes can save you money, there are situations where it’s best to leave the job to a professional plumber. Consider contacting a plumber if:
The clog persists despite your DIY efforts.
You’re unsure about disassembling and reassembling the pressure reducing valve correctly.
The valve is old or damaged, requiring replacement rather than just cleaning.
In these cases, a professional plumber will have the expertise and necessary tools to diagnose and resolve the issue effectively.
Remember, regular maintenance of your mobile home’s plumbing system can help prevent clogs in pressure reducing valves. It’s essential to keep an eye out for any signs of trouble and address them promptly to avoid more significant problems down the line. By understanding how pressure reducing valves function and knowing when to seek professional assistance, you can ensure proper water flow and avoid costly repairs.
So, don’t let clogged pressure reducing valves disrupt your mobile home’s plumbing system. Take action today to maintain optimal water pressure throughout your home!
Tips for Unclogging Toilets, Sinks, and Showers:
Different techniques for unclogging toilets, sinks, and showers
Dealing with clogs in your mobile home plumbing can be a frustrating experience. Fortunately, there are various techniques you can try to unclog toilets, sinks, and showers. Here are some effective methods:
Plunging: Plungers are incredibly useful tools. For toilets, use a flange plunger specifically designed for the curved shape of the toilet bowl. Place the plunger over the drain hole and push down firmly before pulling up quickly. Repeat this motion several times until the water starts draining properly. When dealing with sink or shower clogs, use a cup plunger and create a tight seal around the drain opening.
- Baking soda and vinegar: This natural remedy is great for clearing minor clogs in drains. Start by pouring half a cup of baking soda down the drain followed by one cup of vinegar. Let it sit for about 30 minutes before flushing it out with hot water. The chemical reaction between baking soda and vinegar helps break down organic matter causing the clog.
Boiling water: Boiling water can work wonders on certain types of clogs. Carefully pour boiling water down the drain in stages to avoid causing damage or cracking pipes. The hot water helps dissolve grease buildup that might be causing the blockage.
The importance of using plungers correctly
Using plungers correctly is vital to effectively clear clogs in your mobile home plumbing system. Here are some key tips:
Ensure a proper seal: For toilets, make sure the plunger completely covers the drain hole to create suction. In sink or shower drains, ensure that you have a tight seal around the opening.
Use forceful but controlled motions: Push down firmly on the plunger handle before pulling up quickly to create suction. Repeat this motion several times to dislodge the clog.
Be patient: It may take several attempts before you see results. Don’t give up too soon and continue plunging until the water starts draining properly.
When it’s time to seek professional assistance
While many mobile home plumbing problems can be resolved with DIY techniques, there are instances when it’s best to call in a professional plumber. Here are some signs that indicate it’s time for expert help:
Persistent clogs: If you’ve tried multiple methods but the clog keeps recurring, it could be a sign of a more serious underlying issue in your plumbing system.
Foul odors or gurgling sounds: Unpleasant smells or strange noises coming from your drains could indicate a blockage further down the line or even a sewer line problem.
Multiple affected fixtures: If multiple toilets, sinks, or showers in your mobile home are experiencing simultaneous drainage issues, it suggests a larger problem that requires professional attention.
Remember, tackling complex plumbing problems without proper knowledge and tools can potentially cause more damage and lead to costly repairs.
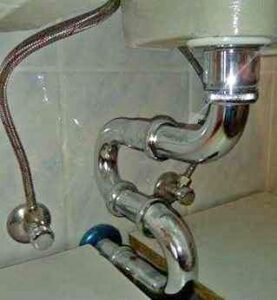
Addressing Low Water Pressure Issues in Mobile Homes:
Causes behind low water pressure in mobile homes
Low water pressure can be a frustrating issue to deal with in any home, but it’s especially common in mobile homes. Understanding the causes behind this problem is the first step towards finding a solution. Here are some common reasons why you might be experiencing low water pressure in your mobile home:
Clogged or dirty aerators: Over time, mineral deposits and debris can build up in the aerators of your faucets and showerheads, restricting the flow of water.
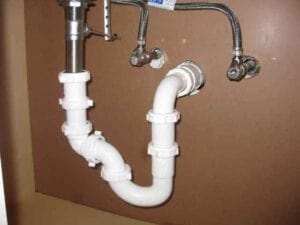
Leaky or damaged pipes: Mobile homes often have older plumbing systems that may develop leaks or damage over time. These leaks can reduce water pressure throughout the entire home.
Corroded water lines: Corrosion can occur in the water lines of mobile homes, leading to reduced flow and lower water pressure.
Issues with the main water supply: If there are problems with the main water supply line connected to your mobile home, such as a blockage or a malfunctioning valve, it can result in low water pressure.
Steps to troubleshoot low water pressure problems
If you’re experiencing low water pressure in your mobile home, here are some steps you can take to troubleshoot and potentially resolve the issue:
Check all faucets and fixtures: Start by checking if the low water pressure is affecting all faucets and fixtures or just specific ones. This will help narrow down where the problem might be originating from.
Inspect for visible leaks: Look for any signs of leaking pipes or fittings underneath sinks, around toilets, and near exposed plumbing areas.
Clean aerators and showerheads: Remove aerators from faucets and showerheads, clean them thoroughly by soaking them in vinegar overnight to remove mineral deposits, then rinse them before reattaching.
Flush the water lines: Turn off the main water supply, open all faucets and fixtures to drain any remaining water, then turn the water supply back on. This can help clear out any debris that might be causing blockages.
Check the water meter: Locate your mobile home’s water meter and ensure it is fully open. If it’s partially closed, it can restrict the flow of water and result in low pressure.
Solutions such as cleaning aerators or replacing pipes
If troubleshooting doesn’t resolve the low water pressure issue, you may need to consider more advanced solutions:
Replace old or damaged pipes: If your mobile home has old or corroded pipes that are causing low water pressure, it may be necessary to replace them with newer ones.
Install a booster pump: A booster pump can increase the pressure of your water supply, ensuring a steady flow throughout your mobile home.
Upgrade to larger diameter pipes: In some cases, upgrading to larger diameter pipes can improve overall water pressure by allowing for greater volume flow.
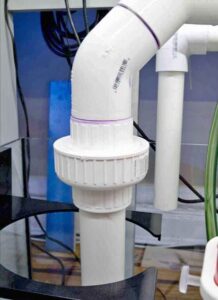
Common Auto Vent and Wax Ring Issues
Signs of Malfunctioning Auto Vents or Wax Rings
Foul Odors: One of the most obvious signs that your mobile home plumbing has auto vent or wax ring issues is a foul smell coming from your bathroom or kitchen drains. This unpleasant odor indicates that the auto vent may not be properly sealing, allowing sewer gases to escape into your living space.
Gurgling Noises: If you hear strange gurgling sounds coming from your drains when you flush the toilet or use the sink, it could be a sign that there is an issue with either the wax ring or auto vent. These noises occur when air is trapped in the plumbing system due to improper sealing.
Slow Draining: When water takes longer than usual to drain from sinks, tubs, or toilets, it may indicate a problem with either the auto vent or wax ring. A clogged vent can disrupt proper drainage by creating a vacuum effect in the pipes, while a faulty wax ring can cause leaks and blockages.
Water Leaks: Another common sign of malfunctioning auto vents and wax rings is water leakage around the base of toilets or beneath sinks. If you notice puddles forming despite no visible cracks in fixtures, it’s likely that these components are not functioning correctly.
Troubleshooting Steps for Fixing Auto Vent or Wax Ring Problems
Checking Auto Vent: Start by inspecting the auto vent for any visible signs of damage such as cracks, loose fittings, or blockages caused by debris buildup. Clean out any obstructions using a wire brush and ensure that all connections are tight.
Replacing Wax Ring: To fix issues related to wax rings, you’ll need to remove the toilet first. Turn off the water supply valve behind your toilet and flush to empty the tank completely. Unscrew bolts securing the toilet to the floor, lift it off, and remove the old wax ring. Replace it with a new one, making sure it is properly centered before reattaching the toilet.
Testing for Proper Sealing: After addressing auto vent or wax ring issues, test for proper sealing by flushing toilets multiple times and running water in sinks or tubs. Listen for any unusual noises or odors and check for leaks around fixtures. If problems persist, further troubleshooting or professional assistance may be required.
The Role of Proper Installation in Preventing These Issues
Proper installation of auto vents and wax rings is crucial in preventing common plumbing problems in mobile homes. When these components are not installed correctly, they can lead to various issues such as sewer gas leaks, slow drainage, and water damage. It’s essential to follow manufacturer guidelines during installation and ensure that all connections are secure.
Hiring Professionals for Complex Auto Vent or Wax Ring Repairs
While some auto vent and wax ring issues can be resolved through simple troubleshooting steps, complex repairs may require professional intervention. Plumbing experts have the knowledge and experience to diagnose underlying problems accurately and provide effective solutions.
Fixing Mobile Home Plumbing: Conclusion
In conclusion, taking proactive steps to prevent mobile home plumbing problems can help you avoid the inconvenience and expense of costly repairs. By regularly inspecting your plumbing system, addressing leaks promptly, and keeping drains clear, you can maintain the functionality and longevity of your mobile home’s plumbing.
Remember to check for shower head leaks and fix them as soon as possible. Regularly inspect your entire plumbing system at least twice a year to catch any potential issues early on. Don’t forget to address clogged pressure reducing valves by cleaning or replacing them when necessary. For sinks, and showers, try using simple tips like plungers or natural drain cleaners.
Low water pressure in mobile homes can be a common problem, but it can often be resolved by checking for blockages or adjusting the pressure regulator. Finally, keep an eye out for common issues like auto vent malfunctions and wax ring problems that may require professional attention.
By following these guidelines and being proactive about maintaining your mobile home’s plumbing system, you can save yourself from the hassle and expense of major repairs down the line.
Remember that prevention is key. Regular maintenance and prompt attention to minor issues will go a long way in avoiding more significant problems in the future.
So take charge of your mobile home’s plumbing today! Invest some time in inspecting your system regularly, addressing leaks promptly, and practicing good drain maintenance habits. Your wallet will thank you!
FAQs: Fixing Mobile Home Plumbing
Q: How often should I inspect my mobile home’s plumbing system?
A: It is recommended to inspect your mobile home’s plumbing system at least twice a year to catch any potential issues early on.
Q: What are some simple tips for unclogging toilets, sinks, and showers?
A: Simple tips include using plungers or natural drain cleaners before resorting to harsh chemicals. Regular maintenance and proper disposal of waste can help prevent clogs.
Q: What can cause low water pressure in mobile homes?
A: Low water pressure in mobile homes can be caused by blockages in the pipes, a faulty pressure regulator, or issues with the main water supply.
Q: Are auto vent malfunctions common in mobile home plumbing?
A: Yes, auto vent malfunctions can occur in mobile home plumbing systems. These should be addressed promptly to ensure proper ventilation and prevent further issues.
Q: How do I know if my wax ring needs to be replaced?
A: Signs of a faulty wax ring include water leakage around the base of the toilet or an unpleasant odor coming from the bathroom. If you notice these signs, it’s best to consult a professional plumber for replacement.
You might also be interested in our articles:
How to Winterize a Mobile Home