
Did you know that water damage to ceilings affects over 14,000 US households annually? Whether it’s from a burst pipe, roof leak, or natural disaster, the aftermath can be devastating. From unsightly stains and peeling paint to potential structural issues, the impact of water-damaged ceilings is far-reaching. In this post, we’ll delve into the causes and signs of ceiling water damage and provide practical tips for prevention and restoration. You’ll also discover the hidden dangers such as mold growth and electrical hazards associated with neglected water damage. Don’t let your ceiling fall victim to this silent threat—stay tuned for expert insights on safeguarding your home from water damage. In this article Water Damage on the Ceiling we will help walk you through solutions to water damage.
Identifying Signs of Water Damage on Ceilings
Discoloration and Staining
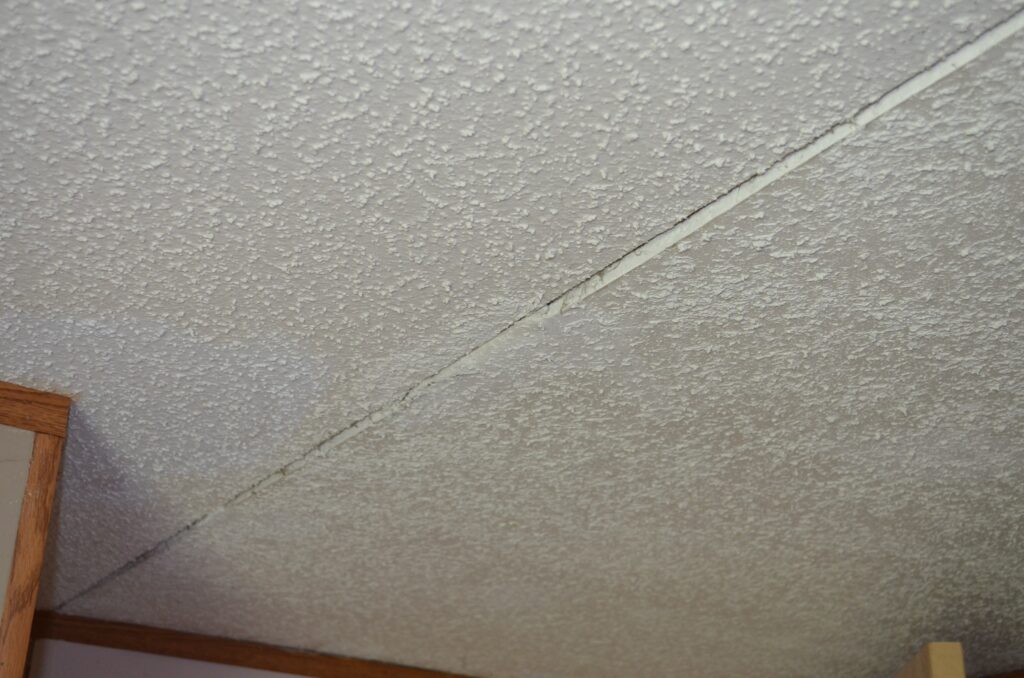
Water damage on ceilings often manifests as discoloration or staining. You may notice yellow, brown, or copper-colored spots on the ceiling. These areas are typically darker than the rest of the ceiling and can vary in size from small spots to larger patches. The discoloration occurs due to water seeping into the ceiling material, causing it to change color as it dries.
When there is a leak in the roof or plumbing system, water can penetrate through and leave behind unsightly stains that are hard to miss. In some cases, these stains might be accompanied by a musty odor, indicating mold growth within the affected area. It’s important to address this issue promptly before it escalates into a more severe problem.
Peeling or Bubbling Paint Another common sign of water damage on ceilings is peeling or bubbling paint. When moisture infiltrates the space between the paint and the ceiling surface, it causes adhesion failure leading to paint deterioration. As a result, you may observe sections where paint appears swollen or blistered.
The presence of peeling or bubbling paint not only detracts from your home’s aesthetic appeal but also serves as an indicator of underlying water intrusion issues that need attention sooner rather than later.
Sagging or Bulging Ceilings
Sagging or Bulging Areas Sagging or bulging areas in your ceiling can signify significant water damage that demands immediate intervention. This occurs when water accumulates within the structure above your ceiling due to leaks from pipes, roofs, or other sources.
If left unaddressed for an extended period, these sagging areas could eventually lead to structural integrity problems and even pose safety hazards if they collapse unexpectedly.
Understanding the Appearance of Water-Damaged Ceilings
Types of Discoloration
Water damage on ceilings can manifest in various forms of discoloration. Stains may appear as yellow or brown patches, indicating water seepage and potential mold growth. In some cases, the discoloration might be accompanied by peeling paint or wallpaper.
When a ceiling suffers from water damage, it often exhibits texture changes such as warping or buckling. The once smooth surface may become uneven due to moisture absorption. This alteration in texture is a clear indication that there’s an underlying issue that needs attention.
Musty Odor Indicating Mold Growth
A musty odor emanating from a ceiling is often a telltale sign of microbial growth resulting from prolonged exposure to moisture. This odor signifies the presence of mold, which poses health risks and should be promptly addressed.
In some instances, visual signs alone may not suffice for identifying water-damaged ceilings; hence, paying attention to any unusual odors becomes crucial in assessing the extent of the damage.
Common Causes of Ceiling Water Damage
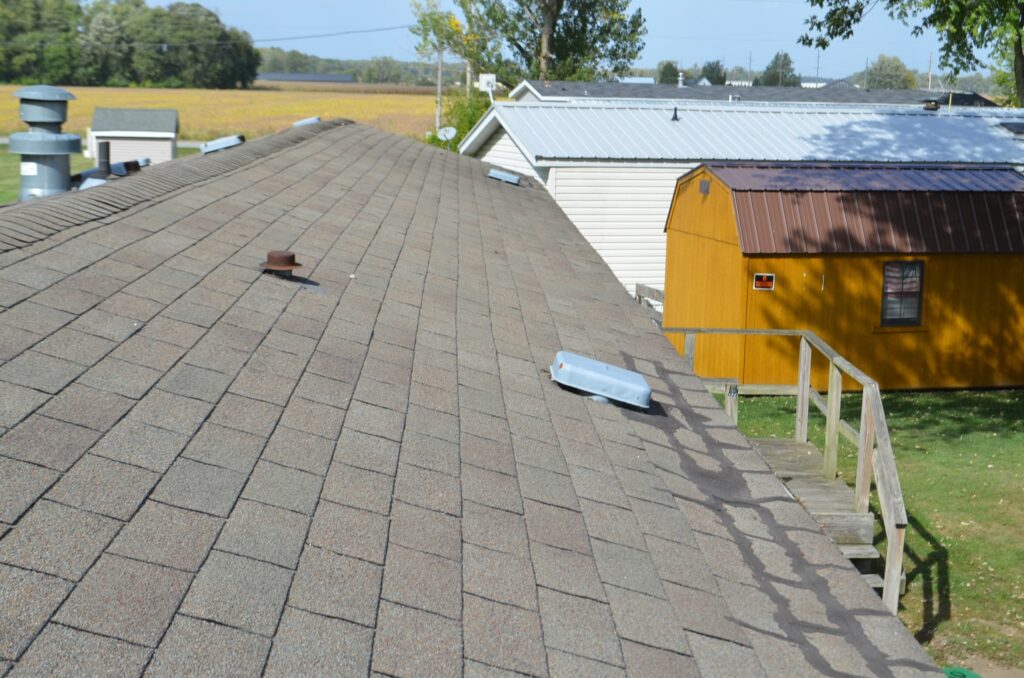
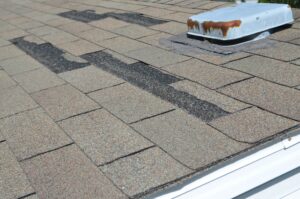
Roof Leaks
Roof leaks, often caused by damaged shingles, are a common culprit for water damage ceiling. When shingles are cracked, missing, or deteriorated, they can allow water to seep through the roof and into the home. This can lead to unsightly stains on the ceiling and even structural damage if left unaddressed.
Plumbing Issues Another prevalent cause of water damage ceiling is plumbing issues such as pipe leaks or burst pipes. A leaking pipe within the ceiling can result in water accumulation that eventually leads to visible damage. Whether it’s due to corrosion, freezing temperatures, or general wear and tear, these plumbing problems can wreak havoc on ceilings.
Condensation and Humidity Problems Excessive condensation and high humidity levels within a home can also contribute to ceiling water damage over time. When warm moist air comes into contact with cooler surfaces like ceilings, it can lead to condensation buildup. If this occurs frequently without proper ventilation or insulation measures in place, it can result in dampness and discoloration on the ceiling.
Locating and Fixing Ceiling Leaks
Inspecting the Attic
When dealing with water damage ceiling, it’s crucial to inspect the attic for roof leaks. Look for any signs of water stains, mold growth, or damp insulation. These could indicate an ongoing leak that is seeping through to the ceiling below. Check around chimney and vent flashings as these are common areas where roof leaks occur.
Another key point is checking for visible signs of plumbing leaks in the attic space. Look for dripping or pooling water near pipes, as well as any signs of moisture on the walls or ceiling joists. Plumbing leaks can also lead to ceiling water damage if left unaddressed.
Using Moisture Meters
One effective method for locating and fixing ceiling leaks is by using moisture meters to pinpoint the source of the issue. Moisture meters can detect hidden pockets of moisture within walls, ceilings, and floors, helping you identify the exact placement of a leak without unnecessary demolition.
For instance, if there’s a small hole in your roof causing a leak into your ceiling, a moisture meter can help you determine which specific area has been affected by measuring the extent of saturation per square foot. This targeted approach saves time and money by avoiding guesswork when addressing water damage issues.
Steps to Dry a Water-Damaged Ceiling
Removing Standing Water
After fixing the ceiling leaks, the next step is to remove any standing water from the affected area. Use a wet vacuum to suck up as much water as possible. Start from the center of the damaged area and work your way outwards in a circular motion. Ensure that you empty the vacuum frequently to maintain its suction power.
Once you have removed all visible water, use clean towels or rags to blot any remaining moisture on the surface of the ceiling. This will help prevent further saturation and promote faster drying. Remember, thorough removal of standing water is crucial for preventing mold and mildew growth.
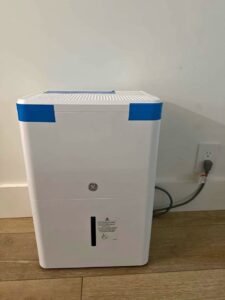
Setting Up Fans and Dehumidifiers
With all visible water removed, it’s time to set up fans and dehumidifiers in the affected room. Position high-powered fans strategically around the room aimed at different angles towards the damaged ceiling. The airflow created by these fans will help accelerate evaporation and drying.
In addition to fans, using a dehumidifier can significantly aid in removing excess moisture from both the air and materials in your home. Place a dehumidifier near or under where most of the damage occurred for more effective results. Keep these devices running continuously until everything is completely dry.
Allowing Ample Time for Thorough Drying
Drying out a water-damaged ceiling thoroughly takes time; rushing this process may lead to long-term issues such as structural damage or mold growth. It’s essential not only to rely on visual cues but also use moisture meters or hygrometers to ensure that no hidden pockets of moisture remain within walls or ceilings.
During this period, monitor progress regularly by checking for signs of dampness or musty odors which could indicate lingering moisture problems behind walls or above ceilings even after they appear dry on their surfaces.
You may be interested in this article as well: Why is My Ceiling Cracking?
Repairing Water-Damaged Ceilings
Cutting Out and Replacing Damaged Drywall
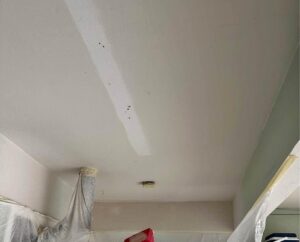
When dealing with water damage ceiling, the first step is to cut out and replace any damaged drywall. Use a utility knife to carefully cut away the wet or damaged areas of the ceiling. Ensure that you remove all affected materials, as leaving even a small portion can lead to mold growth or further structural issues. Once the damaged drywall is removed, allow the area to thoroughly dry before proceeding with repairs.
After drying, measure and cut new pieces of drywall to fit into the open spaces in your ceiling. Secure these pieces in place using screws or nails, making sure they are flush with the surrounding area. Apply joint compound over the seams and sand it down until smooth. This process may require several layers of joint compound for a seamless finish.
Sanding and Repainting Affected Areas
Once the new drywall is installed and any joints are compounded, it’s time to sand down rough spots and apply paint. Use fine-grit sandpaper to smooth out any uneven surfaces on both old and new portions of your ceiling. This will ensure that your repaired areas blend seamlessly with their surroundings.
After sanding, apply primer to prepare the surface for painting. Choose a high-quality paint that matches your existing ceiling color for a uniform appearance once complete. Apply multiple coats if necessary until you achieve an even finish across all affected areas.
Addressing Any Structural Damage
In some cases of significant water damage, structural elements such as beams or joists may also be affected by moisture exposure. If you suspect this type of damage within your attic space, consult a professional contractor who specializes in structural repairs.
Structural repair work should only be carried out by experienced professionals due to safety concerns associated with working at heights within your home’s structure.
Preventing Future Ceiling Water Damage
Regular Inspections
Regular roof inspections are crucial in preventing future water damage ceiling issues. By identifying and addressing any potential problems early on, you can prevent water from seeping into your home through the roof. It’s essential to check for missing or damaged shingles, deteriorated flashing, and clogged gutters. These issues can lead to water infiltration and subsequent ceiling damage.
It’s also important to inspect the attic for signs of leaks or moisture buildup. Look for water stains, mold growth, or damp insulation. Addressing these concerns promptly can help prevent extensive ceiling water damage caused by undetected leaks.
Maintenance and Humidity Levels
In addition to regular inspections, ongoing roof maintenance is necessary to prevent water-damaged ceilings. Keep trees near your home trimmed to prevent branches from damaging the roof during storms. Clear debris from the roof regularly and ensure that downspouts direct water away from the foundation.
Monitoring indoor humidity levels is another critical aspect of preventing future ceiling water damage. Excessive indoor humidity can lead to condensation on windows and walls, which may eventually result in ceiling discoloration and deterioration due to moisture exposure.
Prompt Plumbing Issue Resolution
Promptly addressing any plumbing issues is vital in safeguarding your home against ceiling water damage caused by internal leaks. Leaky pipes or fixtures can cause gradual but significant harm over time if left unattended.
For example:
A leaking pipe within a wall cavity could saturate surrounding materials, leading to eventual structural weakness.
A dripping faucet might seem inconsequential at first glance but could result in persistent moisture accumulation within ceilings over time.
Professional Assistance for Ceiling Water Damage
Certified Water Damage Restoration Company
When dealing with water damage ceiling, it’s crucial to consider hiring a certified water damage restoration company. These professionals have the expertise and equipment to assess the extent of the damage, extract water, and thoroughly dry the affected areas. They can also identify potential mold growth and take appropriate measures to prevent it. A certified restoration company can provide valuable guidance on repairing any structural damage caused by the water.
Seeking assistance from a certified restoration company ensures that the client receives comprehensive solutions for their ceiling water damage problem. These experts are equipped with industrial-grade tools such as moisture meters, dehumidifiers, and air movers to effectively restore the affected area. By engaging their services, homeowners can mitigate further harm and ensure that their ceilings are restored to pre-damage condition.
Consulting with a Roofing Contractor for Repairs
In cases where water damage ceiling is caused by roof leaks or issues with the building’s exterior structure, consulting with a roofing contractor is essential. A qualified roofing professional can inspect the roof for any signs of damage or deterioration that may be contributing to water infiltration into the home. They can then recommend and carry out necessary repairs or replacements to prevent future leaks.
By enlisting a roofing contractor’s expertise in addressing ceiling water damage, homeowners can address underlying issues that may lead to recurrent problems in the future. Whether it’s damaged shingles, deteriorated flashing, or compromised sealants around vents or chimneys, a skilled roofer will be able to identify these issues and implement effective solutions.
Seeking Assistance from a Plumber for Plumbing-Related Issues
For instances where ceiling water damage is attributed to plumbing-related issues such as burst pipes or faulty fixtures, seeking assistance from a plumber is imperative. A licensed plumber possesses specialized knowledge in diagnosing and rectifying plumbing problems that could potentially lead to damaging leaks within walls and ceilings.
Engaging a plumber’s services ensures that underlying plumbing issues contributing to ceiling water damage are promptly addressed at their source. This proactive approach not only resolves immediate concerns but also helps prevent similar incidents from reoccurring in the future through proper maintenance recommendations provided by experienced professionals.
Cost Considerations for Repairing Water Damage
Factors Influencing Costs
The extent of damage to a water-damaged ceiling significantly impacts repair costs. A small leak causing minor discoloration may require minimal repairs, resulting in lower expenses. However, extensive damage from flooding or continuous leaks can lead to more significant structural issues, requiring costly repairs and restoration. The materials needed for the repair also influence the overall cost. For instance, if the damaged area is large and requires replacement drywall or insulation, the expenses will naturally be higher.
When dealing with water damage on a ceiling, it’s essential to consider potential expenses for professional restoration services. Hiring professionals ensures thorough assessment and efficient restoration of the affected area but comes at an additional cost compared to a DIY approach. The expertise offered by professionals can help prevent further damage or mold growth due to inadequate drying.
Budgeting for Preventive Maintenance
Budgeting for preventive maintenance is crucial in avoiding future costs associated with water-damaged ceilings. Regular inspections and maintenance can help identify potential issues early on before they escalate into larger problems that incur higher repair costs. Investing time and resources into addressing minor leaks or weak spots in plumbing systems can result in substantial savings numbers by preventing extensive water damage down the line.
Summary
You’ve learned how to spot water damage on ceilings, understand its causes, and take steps to fix and prevent it. Whether it’s a small leak or a major issue, being proactive is key. Remember, a stitch in time saves nine! Don’t ignore even the smallest discoloration or drip – it could be the tip of the iceberg. Get those leaks fixed pronto to avoid a ceiling catastrophe down the line. And if things get out of hand, don’t hesitate to call in the pros. Prevention is always better than cure, so keep an eye out for potential problem areas and nip them in the bud.
Frequently Asked Questions
What are the common signs of water damage on ceilings?
Water stains, discoloration, sagging areas, and peeling paint or wallpaper are common signs of water damage on ceilings. These indicate that there may be a leak or excess moisture causing damage.
How can I locate and fix a ceiling leak?
To locate and fix a ceiling leak, start by inspecting the area for visible signs of water entry. Then systematically check potential sources such as plumbing fixtures, roof leaks, or condensation issues. Once identified, repair the source promptly to prevent further damage.
What are the steps to dry a water-damaged ceiling?
After fixing the source of water intrusion, use fans and dehumidifiers to dry out the affected area. It’s essential to ensure thorough drying to prevent mold growth and further structural damage.
When should I seek professional assistance for ceiling water damage?
If you’re unable to identify or repair the cause of ceiling water damage yourself or if there is extensive structural harm, it’s advisable to seek professional help. Professionals have the expertise and equipment necessary for thorough assessment and restoration.
How can I prevent future ceiling water damage?
Regularly inspect your home for any signs of leaks or moisture buildup. Maintain your roof in good condition, keep gutters clean, seal windows properly, and address plumbing issues promptly. Preventive measures can significantly reduce the risk of future ceiling water damage.
Check out these articles:
Stains on Ceilings 9+ Ways to Fix This