

Mobile home wall batten strips can make your home look outdated and reduce its value. In 2025, removing these vertical strips is one of the most cost-effective ways to modernize your mobile home’s interior. This comprehensive guide covers everything you need to know about wall batten strip removal, from basic DIY methods to professional finishing techniques that can increase your home’s value by thousands of dollars.
Why Remove Wall Batten Strips in 2025
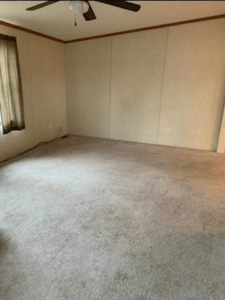
Removing these batten strips is a sure way to give your mobile home more of a modern look inside and make it look up to date especially if you have a used mobile home. So, if you are looking for a new look this is your answer.
Here you will learn what these little wall batten strips do for your mobile home, if you should remove them and a how to get started with your DIY project today.
Wall Batten Strip Trends in 2025
Modern mobile home renovations are moving toward clean, minimalist looks. In 2025, homeowners are prioritizing:
– Smooth walls over vertical dividers
– Open, spacious feeling interiors
– Contemporary finishes that increase home value
– DIY-friendly updates that can be completed in weekends
Planning Your Board and Batten Wall Project
Purpose and Style
When planning your wall batten strips project, think about the purpose of the wall – whether it’s for decoration or to add texture. Consider the style you want to achieve; traditional, modern, or rustic.
Think about how you want your space to feel once the board and batten wall is complete. Do you want a cozy atmosphere in a living room or an airy feel in a hallway? The purpose and style will guide your design decisions.
Measurement and Planning
To ensure you have enough materials like wall batten strips, measure the dimensions of the wall accurately. Measure both height and width to calculate how many boards you’ll need. Create a detailed plan sketching out where each batten strip will go.
Precision is key when measuring as even small errors can lead to material shortages or uneven spacing on your wall. A well-thought-out plan will save time during installation by providing clear guidance on placement.
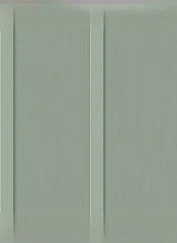
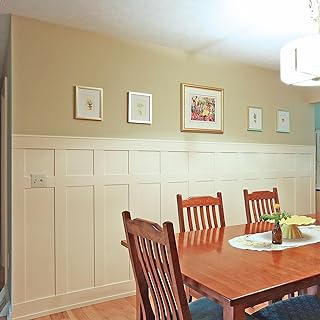
What are These Little Batten Strips?
These little wall strips that run up and down your wall approximately every 8 feet help to cover the seam between the paneling or drywall in your mobile home. These wall strips are usually made of a light plastic but sometimes they are wooden.
The main reason that mobile homes feature these types of walls strips is because they make it easier to transport and assemble the mobile home. When the mobile home gets to its location it is easy to pop these panels into place and then cover them with a quick wall strip.
Question: What Can I Use for Batten Strips?
For wall batten strips, you can use wood, PVC, or MDF (medium-density fiberboard) materials. These strips are commonly employed for decorative purposes, creating paneling, wainscoting, or shiplap designs on walls. Choose a material that suits your aesthetic preferences and project requirements. Looking for the best materials to replace your batten strips click here now to shop many different brands shipped right to your door.
Batten Strip Removal vs. Replacement (2025)
DIY Removal + Professional Finish:** $150-300 per room
Replacing with Faux Battens:** $200-400 per room
Professional Removal Service:** $500-800 per room
Return on Investment:** Can increase mobile home value by $2,000-5,000
Rather than spend the time taping and sanding seams factories found it just easier to run a quick plastic strip between the seam to cover the joint where the two panels meet. This makes the process of putting walls up quicker and cheaper for the factories so they can make these mobile homes affordable.
Should I Remove These Wall Batten Strips?
The answer to this question is YES. You can remove the wall strips to your mobile home. Many mobile homes do this every day to give their mobile home a more stick-built home feel. The best part about this type of upgrade to your mobile home is it is something that you can do yourself.
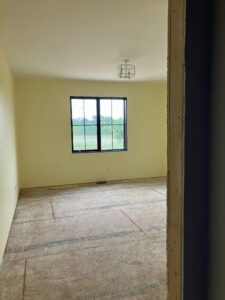
Batten strips were simply added to your mobile home to fill in gaps between milled boards. This would help to moisture, air and other materials from getting in between the pieces of drywall.
Sanding seams adds many long hours to finishing a wall. With batten wall strips you can simply finish off the area quickly. However it does not give as nice as a look as having it finished off.
Interested in Selling Your Mobile Home. Get a FREE quote today!
Step-by-Step Batten Strip Removal Process
Removing the wall strips to your mobile home is simple. Grab a hammer, a putty knife or a crowbar. Then gently work the strip up at the bottom being careful not to damage the side of the panels of the wall. Simply pull up and you will see these strips are typically quite easy to remove.
If you happen to peel up any pieces of drywall just cut the paper. Do not pull on the paper finish to the drywall because you will just do more damage. When you go to cover / mud the seam you can fix this easily. The same is true if you happen to put a small hole in the wall while trying to remove these wall strips.
I would recommend starting in one room rather than removing all the wall strips at once. Doing finish work to fill in where these strips were does take time and some elbow work.
Once the wall strips are removed there is one final step you will want to do before filing these in. Double check to make sure the wall seams are free of any tacks, staples or nails. You do not want to be running your hand quickly down the wall only to snag into one of these.
Wooden Batten Strips
When you remove wooden wall batten strips its important to remember that the strips can break. These wooden strips can make little tiny slivers of wood. You want to make sure that these slivers don’t get down into your carpet because they are tough to remove. It is hard to get them to come up even with a vacuum. So be sure to protect the floor to keep this from happening.
Interested in Selling Your Mobile Home. Get a FREE quote today!
Cost-Effective Alternatives to Consider
Now that you have removed the wall strips you are going to want to find something to replace them with. You have a couple different options when it comes to replacing these wall strips.
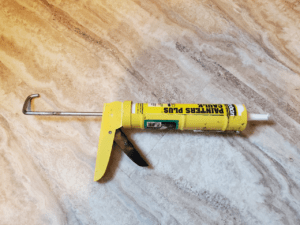
One of the easiest solutions would be to travel down to your local hardware and to pick up some caulk and a caulk gun. This might be your most affordable solution as well. Caulk makes for an easy one step process Be sure to check the caulk tube to see if it is the correct one and it will adhere to your surface, there are so many options when it comes to caulk. You simply caulk the seam and then wet your finger and run it down the seam to smooth it out.
Then take something with a straight edge such as a credit card to run down the wall to make sure that the caulk is even with the wall.
Once the caulk has fully dried you might find that you have a couple areas that need to be filled again. Keep adding caulk and letting it dry until you have the look you desire.
This option is typically better if you plan to wallpaper the walls or if you plan to put some type of board over the walls.
Professional Finishing Techniques
If you are looking for a more professional finish this process might take longer. However, the finished result is amazing. Here are the tools that you will need to professionally fill your wall strip seam.
Complete Tool List for Wall Batten Strip Removal
**Basic Removal Tools:**
– Hammer or small pry bar
– Putty knife (3-inch wide recommended)
– Utility knife with sharp blades
– Drop cloths or plastic sheeting**Professional Finishing Tools:**
– 6-inch and 10-inch drywall knives
– Drywall compound (lightweight formula recommended)
– 120-grit and 220-grit sandpaper
– Dust mask (N95 minimum)
– Safety glasses
– LED work light for spotting imperfections
Making sure your mobile home is level is important to starting this process. If the home is not level this can cause big cracks in the drywall. Read our article on Mobile Home Leveling to learn more.
Question: What is the Difference Between Batten and Furring Strips?
Drywall Mud Options
Drywall mud comes in a couple different types. You can purchase small buckets of it for small jobs. They even have a quick drying formula so you can get the job done faster. The faster drying formula comes in a small bucket and is pink in color. When the mud dries however it dries white.
No matter which mud you choose just be sure to give it a good stir before you apply it.
Interested in Selling Your Mobile Home. Get a FREE quote today!
Use Plastic to Protect Your Floors
Before you start this process it is best if you lay down plastic sheets on your carpet or tile area. You can get these sheets shipped directly to your home by ordering here.
Getting mud or dust in your carpet / tile is tricky to get out. Prepping the area you are about to work in will make the clean up process quicker. Once you are done sanding you can simply fold up the sheet and throw it in the trash.
This Tip Will Save You Time
TIP: If you don’t have any plastic sheets simply take a trash bag and cut it up the seam. Then lay it down on the floor. No matter if you use plastic sheets or a trash bag just be careful moving around. The plastic does cause a slippery surface and you don’t want to fall.
No matter how hard you try to keep all the drywall dust or mud off your floor some is bound to get through. If you have a shop-vac handy these are amazing at cleaning up the dust.
Starting the Process
You will first put one coat of drywall mud down to fill the crack and then run a small thin coat to hold your tape in place.
I would first recommend that you make a run of mud approx. 1 inch wider than your drywall tape. Place the tape on the seam and then run one more coat over top of the drywall tape. This will cover the tape and give you a finished look.
Bubbles and Drywall Tape
TIP: When you are putting mud and tape on the wall strip seam and you happen to get any bubbles in the tape simply follow this step. Take a pin or a razor knife and pop the bubbles. The tape will almost immediately go back down and the bubble will disappear.
Allow the mud to dry and then sand out the mud to a smooth finish.
One reason that mud bubbles is because the walls are cold. Be sure to turn up the heat on your mobile home furnace.
Once you start to sand be sure to put on your google and sanding mask. The dust from this process is very messy.
You will probably need to add one more coat on top of the wall strip seam just to finish out any final bumps.
Mobile Home Drywall Strips
TIP: You can use a fan to speed up the process of helping the mud to dry as well.
When you are all finished sanding your wall take a slightly damp cloth and softly wipe down the wall and seams. You do not want the walls covered in dust when you start to paint. If you do this the paint will simply roll off the walls causing a bigger mess. So be sure to finish cleaning off the walls before you start to prime or paint them.
TIP: be sure to put your drywall knife in hot soapy water once you are done putting mud on the seams. If you let the drywall knife dry with the mud on it it is more difficult to get the mud off.
This smooth professional finish will give you a seamless wall. You can now primer and paint the wall to your desired color.
Replacing and Hanging
If you have a broken wall strip and you are just looking to replace that one you can do that as well. Be sure to pull the one strip off the wall as described above. Then go to your local hardware store or a Lowe’s or Home Depot store were they typically have these in stock.
Be sure to check out our article on Mobile Home Paneling for great paneling ideas in your mobile home.
Faux Wall Batten Strips
Faux Wall Batten Strips: Stylish and Easy Home Transformation
Faux wall batten strips are a fantastic way to add character, texture, and elegance to any room without the hassle and expense of traditional wood battens. These decorative strips mimic the look of real wood battens but are made from lightweight, durable materials such as PVC, MDF, or foam, making them incredibly easy to work with.
Why Faux Wall Batten Strips Are So Easy:
Lightweight and Easy to Handle: Faux batten strips are much lighter than real wood, which means you can easily cut, position, and install them without needing special tools or assistance.
DIY-Friendly: Even if you’re not a seasoned DIYer, faux wall batten strips are simple to install. They typically come in pre-cut sizes, ready to be attached to your wall using adhesive or basic nails. No advanced carpentry skills are required.
Cost-Effective: Faux batten strips are a budget-friendly alternative to real wood, offering the same aesthetic appeal at a fraction of the cost. You can achieve a high-end look without overspending.
Low Maintenance: Unlike real wood, faux strips are resistant to warping, cracking, and pests. They require little to no maintenance, making them a perfect choice for busy households.
Versatile and Customizable: Available in a variety of finishes, colors, and styles, faux batten strips can be easily painted or stained to match your existing decor. They’re also adaptable to different design styles, from modern to rustic.
Quick Installation: The installation process for faux batten strips is straightforward and can often be completed in just a few hours. This makes them an ideal project for a weekend makeover.
Whether you’re looking to enhance a single accent wall or transform an entire room, faux wall batten strips offer a simple, stylish, and stress-free way to achieve a designer look in your home.
Click here to order batten strips like these pictured below: so easy!
Question: In Short How Do You Install Batten Strips:
To install batten strips, first, measure and mark the desired spacing on the wall, ensuring they are level. Then, use nails or screws to secure the strips to the wall, making sure they are evenly spaced and aligned according to your design preferences.
Conclusion:
In conclusion, this is a great project for you and the family. You should be able to easily finish removing the wall strips in your mobile home in a couple days and have them looking great within a weeks’ time.
FAQ’s for Wall Batten Strips
How do you attach battens to a wall?
To attach battens to a wall, measure and mark the desired locations, cut the battens to size, and secure them using screws or nails and a power drill or hammer. Ensure they are level and straight for a clean finish.
What is the difference between batten and furring strips?
Battens and furring strips are both used to create a space or gap between a wall or ceiling and the surface covering, but they serve different purposes. Battens are typically decorative and used to create visual interest, while furring strips are primarily used for structural support, insulation, or leveling walls.
What can I use for batten strips?
Batten strips are commonly made from wood, such as pine or cedar, due to their ease of use and aesthetic appeal. However, you can also use materials like MDF (medium-density fiberboard), PVC, or even metal, depending on your project’s requirements and desired look.
Would board and batten walls require drywall taping?
Board and batten walls typically do not require drywall taping. Board and batten is a style of wall treatment that involves installing vertical boards (battens) over a flat surface (usually drywall). The boards are spaced apart, and the gaps between them create a distinct pattern. In this case, the focus is on the boards and the overall design, rather than achieving a smooth, seamless finish like with drywall taping.
However, it’s important to note that the decision to use drywall taping may depend on the specific design preferences and requirements of the project. If a smooth and finished look is desired in the spaces between the boards, drywall taping might be used in those areas. Ultimately, the choice may vary based on the aesthetic goals and practical considerations of the project.