
Do you need to know how to clean your mobile home dryer vent? Maybe you just need to replace your vent all together. Vent covers and hoses break over time and its important to replace them. In this article we will discuss all the ins and outs to your mobile home dryer vent.
How to Clean Your Mobile Home Dryer Vent
Cleaning your dryer vent is an essential task that ensures the proper functioning of your dryer and reduces the risk of a potential fire hazard. Over time, lint and debris can accumulate in your dryer vent, obstructing airflow and causing your dryer to work harder than necessary. This, in turn, can lead to a higher electricity bill, shorter lifespan of your dryer, and even a potential fire. In this article, we’ll provide a step-by-step guide on how to clean your dryer vent effectively and safely.
Step 1: Unplug Your Dryer
The first and most crucial step is to unplug your dryer from the power source. This ensures that there is no electricity running to your dryer during the cleaning process. This step is particularly important as it minimizes the risk of electric shock while you are working on your dryer.
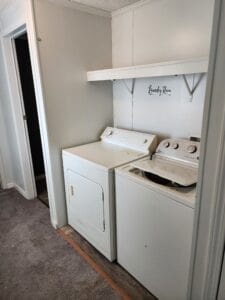
Step 2: Locate Your Mobile Home Dryer Vent
The next step is to locate your mobile home dryer vent. In most cases, the dryer vent is located at the back of the dryer, but it can also be found on the side of the machine. Once you have located your dryer vent, you should be able to identify the vent hood that leads to the outside of your home.
Step 3: Remove the Vent Hood Cover
The vent hood cover can be removed by unscrewing the screws that secure it in place. Once you have removed the cover, you should be able to see the vent opening.
Step 4: Clean the Mobile Home Dryer Vent Opening
Using a vacuum cleaner or a lint brush, remove any lint or debris that is present in the vent opening. Be sure to clean as far into the mobile home dryer vent opening as possible to ensure that all debris is removed.
Step 5: Clean the Vent Pipe
After cleaning the vent opening, it’s time to clean the vent pipe. You can do this by using a dryer vent cleaning kit or a flexible cleaning brush. Attach the cleaning brush to the end of the rod and gently push it through the vent pipe. Make sure to clean as much of the pipe as possible, including any bends or curves.
Step 6: Reattach the Vent Hood Cover
Once you have finished cleaning the vent pipe, it’s time to reattach the vent hood cover. Simply screw the cover back into place.
Step 7: Clean the Dryer Lint Trap
The final step is to clean the dryer lint trap. The lint trap is located inside the dryer, and it’s essential to clean it regularly to prevent lint from accumulating in the vent pipe. To clean the lint trap, simply remove it from the dryer and use a lint brush or vacuum cleaner to remove any lint or debris that is present.
In conclusion, cleaning your dryer vent is a simple yet essential task that can help prevent potential fire hazards and keep your dryer functioning properly. By following these seven steps, you can clean your dryer vent safely and effectively, ensuring that your dryer runs smoothly and efficiently for years to come. Remember to perform this task at least once a year to ensure the safety and longevity of your dryer.
Looking for parts for your dryer hose, vent or cover delivered right to your doorstep. Check out this link for more information.
How To Replace a Mobile Home Dryer Vent Hose
Replacing your dryer vent hose is a necessary maintenance task that should be done periodically. Over time, the vent hose can become damaged or clogged with lint, which can affect the airflow and efficiency of your dryer. In this article, we will provide a step-by-step guide on how to replace your dryer vent hose.
Step 1: Turn off the Power
Before you begin, make sure to turn off the power to your dryer. You can do this by unplugging it or by turning off the circuit breaker that powers the dryer.
Step 2: Locate the Vent Hose
The vent hose is usually located at the back of the dryer and attaches to the vent opening. Carefully pull the dryer away from the wall to access the hose.
Step 3: Disconnect the Old Vent Hose
Use a screwdriver or pliers to loosen the clamp that secures the vent hose to the dryer’s vent opening. Then, carefully slide the hose off the opening. If the hose is stuck, you may need to use a bit of force to wiggle it loose. Be careful not to damage the vent opening in the process.
How to Replace a Mobile Home Dryer Vent House Continued
Step 4: Remove the Old Hose
Once the hose is disconnected from the dryer, remove it from the wall or mobile home dryer vent opening. Be careful not to damage the vent opening or the hose itself, as you may need to reuse the opening if it’s in good condition.
Step 5: Measure and Cut the New Hose
Using a tape measure, measure the length of the vent opening and cut the new hose to the appropriate length. Make sure to leave a little extra length to allow for any bends or curves in the hose.
Step 6: Attach the New Hose
Carefully slide the new hose onto the vent opening and secure it in place with the clamp. Make sure that the hose is securely attached and that there are no gaps or leaks.
Your Almost Done with Replacing A Mobile Home Dryer Vent Hose
Step 7: Reconnect the Dryer
Push the dryer back into place and make sure that it’s level. Then, plug the dryer back in or turn the circuit breaker back on.
Step 8: Test the Dryer
Turn on the dryer and let it run for a few minutes to make sure that the new hose is working properly. Check for any leaks or gaps in the hose and make sure that the dryer is heating and drying clothes effectively.
In conclusion, replacing your dryer vent hose is a relatively simple task that can help improve the efficiency and safety of your dryer. By following these eight steps, you can replace your vent hose safely and effectively, ensuring that your dryer runs smoothly and efficiently for years to come. Remember to perform this task at least once a year to ensure the safety and longevity of your dryer.
Looking for parts for your dryer hose, vent or cover delivered right to your doorstep. Check out this link for more information.
Replace the Cover to Your Mobile Home Dryer Vent
If the cover to your dryer vent is damaged or missing, it can allow pests, debris, and weather elements to enter your home. It can also affect the efficiency of your dryer. Replacing the cover to your dryer vent is a simple task that you can do yourself with a few basic tools. In this article, we will provide a step-by-step guide on how to replace the cover to your dryer vent.
Step 1: Turn off the Power
Before you begin, make sure to turn off the power to your dryer. You can do this by unplugging it or by turning off the circuit breaker that powers the dryer.
Step 2: Remove the Old Cover
Use a screwdriver or pliers to remove the screws that hold the old cover in place. Carefully remove the cover and set it aside.
Step 3: Clean the Vent Opening
Before installing the new cover, use a vacuum or brush to clean any debris or lint from the vent opening. This will ensure that the new cover fits snugly and securely.
Step 4: Measure the Vent Opening
Using a tape measure, measure the dimensions of the vent opening. Make note of the width, height, and depth of the opening.
Replacing the Cover to Your Mobile Home Dryer Vent: Your Almost Done
Step 5: Choose the Right Cover
Choose a cover that fits the dimensions of your vent opening. There are different types of covers available, including metal, plastic, and louvered covers. Make sure to choose a cover that is appropriate for your climate and weather conditions.
Step 6: Install the New Cover
Align the new cover with the vent opening and use screws to secure it in place. Make sure that the cover is flush with the opening and that the screws are tight.
Step 7: Test the Dryer
Turn on the dryer and let it run for a few minutes to make sure that the new cover is working properly. Check for any leaks or gaps in the cover and make sure that the dryer is heating and drying clothes effectively.
In conclusion, replacing the cover to your dryer vent is a quick and easy task that can improve the efficiency and safety of your dryer. By following these seven steps, you can replace the cover safely and effectively, ensuring that your dryer runs smoothly and efficiently for years to come. Remember to perform this task at least once a year to ensure the safety and longevity of your dryer.
Looking for parts for your dryer hose, vent or cover delivered right to your doorstep. Check out this link for more information.
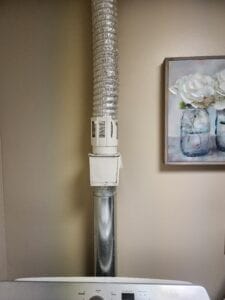
Mobile Home Dryer Vent Clean Out
If you have a vent that goes up behind your dryer you could add a clean out area for the vent. See picture below. This clean out pops down and you can place a vacuum hose inside it to clean out the area.
Mobile Home Dryer Vent in Floor
Some mobile homes have dryer vents that go into the floor for several reasons. One of the main reasons is that mobile homes often have limited space, and placing the dryer vent in the floor allows for more efficient use of space.
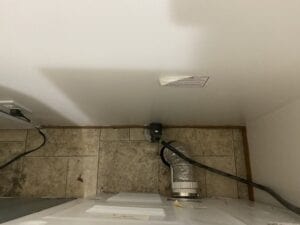
Additionally, many mobile homes have a crawl space beneath the floor, which can provide easy access for installing and maintaining the dryer vent.
Finally, some mobile homes have a specific design that requires the dryer vent to be installed in the floor, either for aesthetic or functional reasons.
Mouse in Dryer Vent Hose
Discovering a mouse in your dryer vent can be a concerning and frustrating experience. Not only can mice cause damage to your dryer vent, but they can also pose a health risk by carrying diseases and leaving droppings. In this article, we will provide some tips on what to do if you find a mouse in your dryer vent.
Step 1: Turn off the Power
Before you begin, make sure to turn off the power to your dryer. You can do this by unplugging it or by turning off the circuit breaker that powers the dryer.
Step 2: Identify the Location of the Mouse
Try to identify the location of the mouse in your dryer vent. If the mouse is stuck in the vent, you may need to disassemble the vent to remove it. If the mouse is free to move around, you can try to lure it out using bait or by creating a path for it to escape.
Step 3: Create a Path for the Mouse to Escape
To create a path for the mouse to escape, open a door or window near the dryer vent. This will provide the mouse with an alternative exit point and may encourage it to leave on its own.
Mouse in Dryer Vent House: Get It Out
Step 4: Use Bait to Lure the Mouse Out
If the mouse is stuck in the vent, you can use bait to lure it out. Place some bait, such as peanut butter or cheese, on a trap or on a piece of cardboard and place it near the vent opening. Make sure to check the trap regularly and dispose of any dead mice in a sealed bag.
Step 5: Clean and Sanitize the Dryer Vent
After removing the mouse, it’s important to clean and sanitize your dryer vent to prevent the spread of disease and to remove any remaining droppings or debris. Use a vacuum or brush to remove any debris or droppings from the vent, and then sanitize it with a disinfectant spray.
Step 6: Prevent Future Infestations
To prevent future infestations, seal any gaps or cracks in the vent and surrounding area. You can also use mouse traps or repellents to deter mice from entering the vent.
If you have mice in your mobile home read our article on Mice and Your Mobile Home.
Mobile Home Dryer Vent: Conclusion
In conclusion, finding a mouse in your dryer vent can be a frustrating and concerning experience. By following these six steps, you can safely and effectively remove the mouse and prevent future infestations. Remember to perform regular maintenance on your dryer vent to ensure its efficiency and safety.
Read our article on Mobile Home Maintenance.
Having anything blocking your mobile home dryer vent is dangerous. If you discover that you have lint built up or a rodent in the vent you must fix the situation as soon as possible. Hopefully this article Mobile Home Dryer Vent gave you some tips and tricks.
FAQ’s: Mobile Home Dryer Vent
How do you vent a dryer without a vent to the outside?
Venting a dryer without access to an outside wall or window can be done by using a ventless or condensing dryer, which doesn’t require a traditional outdoor vent. These dryers use technology to remove moisture from the air, condense it, and drain the water, allowing them to be placed in various locations within your home.
Is it against code to vent a dryer inside?
Venting a dryer inside is typically against building codes and safety regulations due to the potential for moisture buildup, lint accumulation, and reduced indoor air quality. Venting a dryer inside can lead to health and safety issues, so it’s generally discouraged and not recommended.
Does a portable dryer have to be vented outside?
Portable dryers, such as ventless or condensing models, do not require venting outside because they are designed to operate without an outdoor vent. They are a suitable option for situations where traditional venting isn’t feasible.
Does the dryer vent have to go outside?
For traditional dryers, the vent must go outside to safely expel hot air, moisture, and lint. This ensures proper ventilation and reduces the risk of fire hazards. Proper outdoor venting is a crucial safety requirement for conventional dryers.
You might also be interested in our article How to Clean Air Ducts in a Mobile Home.
Also check out our article I Saw One Cockroach Should I Be Worried.