
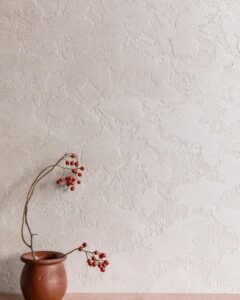
Have you ever felt like your plain walls are lacking character and personality? Are you searching for a way to transform your space into something truly remarkable? We understand the importance of creating a visually appealing and functional interior design, and that’s why we’re here to help you discover the world of textured walls. In this article 7 Unique Ways to Texture Walls we will discuss all the different ways to make your walls pop with texture.
7 Unique Ways to Texture Walls
Adding texture to your walls can instantly elevate the aesthetics of any room. But it’s not just about looks – textured walls offer numerous benefits beyond their visual appeal. From hiding imperfections to enhancing acoustics, they bring both style and functionality to your living spaces.
We’ll also guide you through the process of choosing the right texture product and primer for a flawless finish. So, if you’re ready to embark on a journey of transforming your walls into stunning focal points, buckle up and let’s dive in!
7 Different Ways to Textur Walls: Different Designs
So, you want to give your walls a little extra oomph and add some texture to make them stand out. Well, lucky for you, there are several methods you can explore to achieve this desired effect. Let’s take a look at three popular approaches: joint compound, wood panels, and moulding.
Joint Compound: 7 Unique Ways to Texture Walls
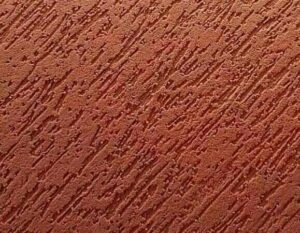
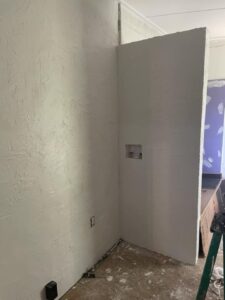
One of the most common ways to texture walls is by using joint compound. This versatile material is typically used for filling in gaps between drywall panels, but it can also be used to create various textures. The process involves applying the joint compound onto the wall surface and then manipulating it with different tools or techniques to achieve the desired texture.
Pros: 7 Unique Ways to Texture Walls
Cost-effective option compared to other methods.
Can be easily customized and adjusted to create different textures.
Suitable for both smooth and rough textures.
Cons: 7 Unique Ways to Texture Walls
Requires some level of skill and practice to achieve desired results.
Time-consuming process as multiple layers may be needed.
May require sanding and priming before painting.
Wood Panels
If you’re looking for a more rustic or natural look, wood panels can be an excellent choice for adding texture to your walls. Wood panels come in various styles, such as shiplap or beadboard, and can instantly transform a plain wall into a visually appealing feature.
Pros:
Adds warmth and character to any space.
Easy installation with interlocking panels or adhesive.
Can be painted or stained in different colors.
Cons:
Higher cost compared to other methods.
Limited design options compared to joint compound textures.
Requires careful planning for proper alignment and spacing.
Moulding: 7 Unique Ways to Texture Walls
Moulding is another fantastic way to add texture and depth to your walls. It involves attaching decorative trim pieces along the edges or in patterns on the wall surface. Moulding comes in various styles, including crown moulding, chair rail moulding, and baseboard moulding, allowing you to choose the one that best suits your aesthetic preferences.
Pros:
-
Enhances the architectural features of a room.
-
Adds elegance and sophistication to any space.
-
Can be painted or stained to match the wall color or create contrast.
Cons:
-
Requires precise measurements and cutting for proper installation.
-
Higher cost compared to joint compound textures.
-
Limited design options based on available moulding styles.
When considering which method to use for texturing your walls, there are a few factors you should take into account. The cost is an essential consideration as some methods may be more budget-friendly than others. Think about the time required for each technique and whether you have the necessary skills to execute it successfully.
Remember that each method offers its own unique advantages and disadvantages. Joint compound provides versatility but requires practice, wood panels offer a natural look but can be costly, while moulding adds elegance but may have limited design options. Consider your desired outcome, personal style, and budget before making a decision.
Achieving 7 Unique Ways to Texture Walls with Joint Compound
Step-by-step process of applying joint compound to create texture on walls
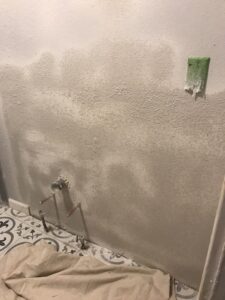
Creating texture on your walls can add depth and visual interest to any room. One popular method is using joint compound, also known as drywall compound or taping compound, to achieve a textured finish. Here’s a step-by-step guide on how to texture your walls using joint compound:
-
Prepare the surface: Ensure that the wall surface is clean, smooth, and free from any debris or loose paint. Repair any cracks or holes in the wall using spackling paste and allow it to dry.
-
Select the right joint compound: There are different types of joint compounds available, such as lightweight or all-purpose compounds. Choose one that suits your project requirements.
-
Mix the compound: Follow the manufacturer’s instructions for mixing the joint compound with water to achieve the desired consistency. It should be thick enough to hold its shape but still spreadable.
-
Apply a base coat: Use a wide putty knife or trowel to apply a thin layer of joint compound evenly over the entire wall surface. This serves as a base for creating texture later on.
-
Create texture: While the base coat is still wet, use various tools like brushes, sponges, or even crumpled plastic wrap to create texture by lightly pressing them into the wet compound. Experiment with different techniques until you achieve your desired effect.
-
Let it dry: Allow the textured wall to dry completely before proceeding further. This may take anywhere from 24 hours to several days depending on humidity levels and thickness of application.
-
Sand and smooth: Once dry, lightly sand down any rough edges or high spots using fine-grit sandpaper until you achieve a smooth finish.
-
Prime and paint: Apply a coat of primer over the textured surface before painting to ensure proper adhesion and a uniform finish. Once the primer is dry, you can proceed with painting your walls in your desired color.
Tips for selecting the right tools and materials for the job
When working with joint compound to texture your walls, it’s important to have the right tools and materials on hand. Here are some tips to guide you:
-
Tools: Invest in high-quality tools such as putty knives, trowels, brushes, and sponges. These will help you achieve better results and make the application process easier.
-
Materials: Choose a reliable brand of joint compound that suits your project needs. Consider factors like drying time, workability, and ease of sanding when making your selection.
Common mistakes to avoid when working with joint compound
Working with joint compound may seem simple, but there are some common mistakes that can affect the final result. Here are a few things to avoid:
-
Overworking the compound: Avoid excessive smoothing or re-texturing once the compound starts drying.
Enhancing Walls with Decorative Wood Panels and Moulding
Decorating your walls is a great way to add personality and style to any room. If you’re looking for ways to enhance your walls and create texture, decorative wood panels and moulding can be excellent options. They not only add depth but also provide visual interest that can transform the overall look of a space.
Adding Depth with Decorative Wood Panels
Decorative wood panels are an excellent choice for creating texture on your walls. They come in various styles, such as wainscoting and shiplap, each offering a unique aesthetic appeal. These panels can be installed on a portion of the wall or cover the entire surface, depending on your preference.
Pros:
-
Adds depth and dimension to flat walls.
-
Provides an elegant and timeless look.
-
Offers versatility in design options.
Cons:
-
Requires proper installation for optimal results.
-
May require additional maintenance compared to smooth walls.
To install decorative wood panels, start by measuring the area where you want them installed. Cut the panels according to your measurements, ensuring they fit snugly against the wall. Use construction adhesive or nails to secure them in place. Consider adding panel moulding around the edges for a finished look.
Creating Texture with Moulding Options
Moulding is another fantastic option for adding texture to your walls. There are various types of moulding available, including crown moulding, chair rail moulding, and baseboard moulding. Each type offers its own unique design element that enhances the overall aesthetic of a room.
Pros:
-
Adds architectural interest and elegance.
-
Conceals imperfections along corners and edges.
-
Provides versatility in design choices.
Cons:
-
Requires precision cutting and installation.
-
Can be challenging for those without construction experience.
When installing moulding, it’s essential to measure carefully before cutting each piece. Use a miter saw or coping saw to create precise angles for corners. Apply construction adhesive or use nails to secure the moulding in place. Sand and paint the moulding to achieve a seamless look that complements your walls.
Installation Tips and Techniques: 7 Unique Ways to Texture Walls
To achieve professional results when installing decorative wood panels and moulding, consider the following tips:
-
Prepare the walls: Ensure that your walls are clean, dry, and free from any debris before installation.
-
Plan the layout: Measure and plan where you want the panels and moulding to be installed for a balanced look.
-
Use proper tools: Invest in quality tools such as a miter saw, coping saw, level, and measuring tape for accurate cuts and installations.
-
Secure properly: Whether using construction adhesive or nails, make sure the panels and moulding are securely fastened to prevent shifting over time.
-
Finish with care: Sand down any rough edges or imperfections before applying paint or stain for a polished finish.
Adding Depth with Thick Wooden Ceiling Beams
To truly transform a space and add texture to your walls, don’t forget about the often overlooked ceiling! One fantastic way to achieve this is by incorporating thick wooden beams into your ceiling design. These beams not only add depth and character but also create a warm and inviting atmosphere in any room. Let’s explore the advantages of using thick wooden beams, design considerations, installation methods, and maintenance tips for achieving that perfect textured look.
Advantages of Using Thick Wooden Beams
Thick wooden beams can bring a rustic charm or a touch of elegance to any space. Here are some advantages of incorporating these beams into your ceiling:
-
Visual Appeal: The natural beauty of wood adds warmth and richness to the overall aesthetic of a room.
-
Texture and Depth: Wooden beams provide visual interest and create an illusion of depth, making the ceiling appear higher or cozier depending on the desired effect.
-
Versatility: Whether you prefer a traditional or modern style, wooden beams can be customized to suit various design aesthetics.
-
Durability: High-quality wooden beams are built to last, ensuring long-term structural integrity.
Design Considerations when Incorporating Wooden Beams
Before diving into adding wooden beams to your ceiling, consider these design factors:
-
Ceiling Height: Take into account the height of your ceilings when selecting beam sizes. Higher ceilings can accommodate larger and thicker beams for a more dramatic effect.
-
Room Size: In smaller rooms, opt for narrower or lighter-colored beams to avoid overwhelming the space visually.
-
Beam Placement: Decide whether you want symmetrical or asymmetrical beam placement based on your desired aesthetic outcome.
Installation Methods and Maintenance Tips: 7 Unique Ways to Texture Walls
There are several options available:
-
Faux Beams: Faux wood beams made from lightweight materials such as polyurethane or foam are a cost-effective and easy-to-install alternative to real wood.
-
Exposed Beams: For a more authentic look, consider using real wooden beams. These can be installed by attaching them directly to the ceiling or by suspending them from the ceiling with brackets.
-
Finishing Touches: Once your beams are in place, you can stain or paint them to match your desired color scheme. This step adds an extra layer of customization and enhances the overall appearance.
To ensure your wooden beams stay in top condition, follow these maintenance tips:
-
Regular Cleaning: Dust your beams regularly to prevent buildup and maintain their natural beauty.
-
Inspect for Damage: Check for any signs of damage such as cracks or warping and address them promptly to prevent further deterioration.
-
Protective Coating: Applying a protective coating can help preserve the wood’s integrity and extend its lifespan.
Creating Geometric Coffered Ceilings for Texture and Dimension
If you’re looking to add a unique touch to your room’s walls, why not consider coffered ceilings? These ceilings not only provide texture but also add dimension and visual interest to any space.
Explanation of Coffered Ceilings as a Unique Way to Add Texture to a Room
Coffered ceilings are architectural features that consist of recessed panels or beams arranged in a grid pattern. They create an illusion of depth and can be customized with various geometric shapes and designs. By incorporating coffered ceilings into your room’s design, you can instantly elevate its aesthetic appeal while adding texture and character.
Step-by-Step Guide on Designing Geometric Patterns for Coffered Ceilings
-
Measure and Plan: Start by measuring the dimensions of your ceiling and determining the size and spacing of the coffered panels. Consider the overall layout of the room and how the pattern will complement other elements.
-
Choose a Geometric Pattern: Decide on a geometric pattern that suits your style preferences. Popular choices include squares, rectangles, hexagons, or even more intricate designs like stars or diamonds.
-
Mark the Ceiling: Use a pencil or chalk line to mark the locations where each panel will be installed. Ensure they are evenly spaced and aligned according to your chosen pattern.
-
Install Beams or Moulding: Depending on your desired look, install wooden beams or moulding along the marked lines to create the framework for each panel. Make sure they are securely attached to ensure durability.
-
Fill in Panels: Once the framework is in place, fill in each panel with drywall or another material of your choice. Smooth out any imperfections with sandpaper and apply multiple coats of paint for a polished finish.
Tips on Installation, Lighting Placement, and Finishing Touches
-
Installation: Take your time during the installation process to ensure accuracy and precision. Use a level to keep the panels straight and even. Seek professional help if needed.
-
Lighting Placement: Consider incorporating recessed lighting within the coffered ceiling to highlight the texture and create an ambient atmosphere. Strategically place fixtures to illuminate specific areas or accentuate certain patterns.
-
Finishing Touches: Add crown moulding around the edges of the coffered ceiling for a refined look. Consider using contrasting colors for the beams or panels to enhance visual interest.
Coffered ceilings offer endless possibilities. With careful planning, precise installation, and attention to detail, you can transform an ordinary ceiling into a stunning focal point that elevates the overall aesthetic of your room.
So go ahead, let your creativity flow, and embark on this exciting project that will undoubtedly leave you with a visually captivating space!
Using Machines and Rollers for Wall Texturing
To achieve the desired texture effect on your walls, you can utilize specialized machines and rollers. These tools are designed to make the texturing process easier and more efficient. Let’s explore how these machines and rollers can help you achieve professional-looking textured walls.
Overview of Specialized Machines and Rollers
There are various tools available that can assist in creating different textures. Here’s an overview of some commonly used machines and rollers:
-
Texture Machine: A texture machine, also known as a texture sprayer or hopper gun, is a device that uses compressed air to spray texture material onto the walls. It allows for quick and even application of texture, making it ideal for larger projects.
-
Paint Roller: A paint roller with a special texture cover can also be used to create textured walls. These rollers have patterns or designs on their surface that transfer onto the wall when rolled over it. They offer a simple yet effective way to add texture without the need for additional equipment.
Tips on Choosing the Right Equipment: 7 Unique Ways to Texture Walls
Selecting the right equipment is crucial in achieving your desired wall texture effect. Consider these tips when choosing machines or rollers:
-
Texture Effect: Determine the specific texture effect you want to achieve before selecting your equipment. Different machines and rollers produce varying textures such as popcorn, knockdown, or orange peel.
-
Project Size: Consider the size of your project when choosing between machines and rollers. Texture machines are better suited for larger areas, while paint rollers work well for smaller spaces or touch-ups.
-
Safety Precautions
Operating machinery or using rollers requires certain safety precautions to ensure a smooth and accident-free process:
-
Wear protective gear such as goggles, gloves, and masks to protect yourself from airborne particles.
-
Follow manufacturer instructions carefully when operating machinery.
-
Keep children and pets away from the work area to avoid accidents.
Using machines and rollers for wall texturing can greatly simplify the process and help you achieve professional results. However, it’s important to take necessary safety precautions and choose the right equipment based on your desired texture effect and project size.
Unique Options: Tactile Wallpaper and Brick Facades
If you’re looking to add some pizzazz to your walls, there are innovative ways to achieve textured walls without the need for extensive masonry work. Two unique options that can transform your space are tactile wallpaper and brick facades. Let’s explore these options and discover the versatility and design possibilities they offer.
Innovative ways to achieve textured walls through tactile wallpaper
Tactile wallpaper is a fantastic option for adding texture and visual interest to your walls. It comes in various designs, patterns, colors, and textures, allowing you to create a customized look that suits your style. Whether you want a concrete-like texture or an orange peel effect, tactile wallpaper offers endless possibilities.
Pros of using tactile wallpaper:
-
Easy installation process compared to traditional wall texturing methods.
-
Wide range of styles and patterns available.
-
Can be easily removed or changed if desired.
Cons of using tactile wallpaper:
-
May not provide the same level of authenticity as actual concrete or brick.
-
Requires careful consideration when matching patterns across multiple rolls.
Creating an authentic brick facade without actual masonry work
If you’ve always dreamed of having exposed brick walls but don’t want the hassle or expense of real bricks, consider creating a faux brick facade. With this technique, you can achieve the look and feel of real bricks without any heavy construction work.
To create a faux brick facade:
-
Prepare the surface by cleaning it thoroughly and applying a base coat in your desired color.
-
Use a stencil or template to mark out the pattern of bricks on the wall.
-
Apply layers of paint with different shades using a brush or sponge, mimicking the natural variations in color found in real bricks.
-
Use a knife or other tools to create indentations or scrape off paint in certain areas for added texture and depth.
-
Optional: Seal the finished faux brick facade with a clear coat for added durability.
Pros of creating a faux brick facade:
-
Provides the look and feel of real bricks without the cost or labor-intensive installation.
-
Offers customization options in terms of color, pattern, and texture.
-
Can be easily modified or removed if desired.
Cons of creating a faux brick facade:
-
Requires precision and attention to detail to achieve a realistic look.
-
May not provide the same level of authenticity as actual bricks.
Both tactile wallpaper and faux brick facades offer unique ways to add texture and visual interest to your walls. Whether you prefer the versatility of tactile wallpaper or the charm of a faux brick facade, these options allow you to express your personal style and create an ambiance that suits your taste. So go ahead, get creative, and transform your walls into stunning focal points!
You might also be interested in our article:
Brick Backsplash and 15+ Other Ideas
Mastering the Art of Texturing Walls
Congratulations! You’ve now explored various methods for texturing walls, from using joint compound to incorporating decorative wood panels and moulding. You’ve also learned about adding depth with thick wooden ceiling beams, creating geometric coffered ceilings, and utilizing machines and rollers for wall texturing. We discussed unique options like tactile wallpaper and brick facades.
Now that you have a solid understanding of different techniques, it’s time to unleash your creativity and transform your walls into stunning textured masterpieces. Whether you want to add a rustic touch or a modern flair, the possibilities are endless. So roll up your sleeves, grab your tools, and let your imagination run wild as you embark on this exciting journey of transforming ordinary walls into extraordinary works of art!
FAQs: 7 Unique Ways to Texture Walls
How long does it take to texture walls?
The time it takes to texture walls depends on several factors such as the size of the area, the complexity of the chosen technique, and your level of experience. Generally speaking, smaller rooms or sections can be completed within a day or two. However, if you’re tackling larger areas or intricate designs, it may take several days or even weeks to achieve the desired results.
Can I texture over existing wallpaper?
In most cases, it is not recommended to texture over existing wallpaper as the texture may not adhere properly and could result in an uneven finish. It’s best to remove any existing wallpaper before applying texture to ensure a smooth surface.
Do I need professional help to texture my walls?
While hiring a professional can guarantee flawless results, texturing walls is also an achievable DIY project for those willing to put in some effort and practice. With proper research, preparation, and patience, you can successfully texture your own walls without professional assistance.
What tools do I need for wall texturing?
The tools required for wall texturing will vary depending on the technique you choose. Some common tools include a trowel, joint compound, sandpaper, paint rollers, texture brushes, and painter’s tape. It’s important to gather all the necessary tools before starting your project to ensure a smooth workflow.
Can I paint over textured walls?
Yes, textured walls can be painted just like any other surface. However, it’s important to consider the type of texture and its effect on the final paint finish. Some textures may require additional preparation such as priming or sanding before painting to achieve the desired result.
You might also be interested in our articles: