
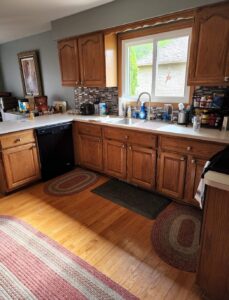
Are your mobile home cabinets in desperate need of a makeover? Wondering how to bring new life into your kitchen or bathroom without breaking the bank? Look no further! We’ve got you covered with an easy-to-follow tutorial that will have your mobile home looking like a million bucks.
Revamp Mobile Home Cabinets
Updating your cabinets is not only essential for enhancing the overall aesthetic appeal of your mobile home, but it also comes with a plethora of benefits. From increasing the value of your property to transforming the entire ambiance, repairing and painting cabinets can work wonders.
In this step-by-step project, we’ll guide you through every corner and back door of cabinet repair and painting. With helpful tips, detailed instructions, captivating photos, and even an informative video, you’ll be able to tackle this project with confidence and achieve fantastic results in no time. So grab your paintbrushes and head over to Home Depot for all the necessary hardware – let’s get started on this exciting transformation!
Step-by-step guide for updating mobile home cabinets
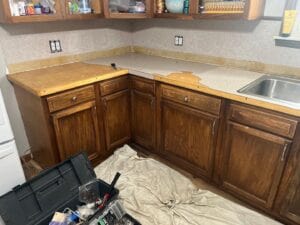
Removing cabinet doors and hardware
The first step in updating your mobile home cabinets is to remove the cabinet doors and hardware. This will allow you to work on them more easily and ensure a smooth painting process. Start by unscrewing the hinges that attach the doors to the cabinets. Place the screws in a safe place, so they don’t get lost. Then, carefully lift off the doors and set them aside.
Next, remove any knobs or handles from the cabinet doors and drawers. You can use a screwdriver or drill to unscrew them, depending on how they are attached. Keep these pieces together in a separate container, so you don’t misplace them during the painting process.
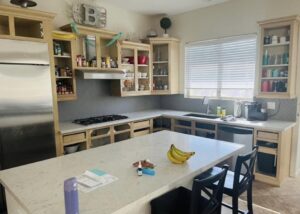
Sanding and prepping the cabinet surfaces
Once you have removed all the doors and hardware, it’s time to sand and prep the cabinet surfaces. Use sandpaper or an electric sander to gently roughen up the surface of the cabinets. This will help create a better bond between the paint and the wood or MDF material.
After sanding, wipe down all surfaces with a damp cloth to remove any dust or debris. If there are any noticeable dents or holes in the cabinets, now is also a good time to fill them with wood filler or putty. Allow it to dry completely before moving on to the next step.
Applying primer to ensure paint adhesion
To ensure that your paint adheres properly to your mobile home cabinets, it’s important to apply a primer before painting. Choose a primer that is specifically designed for use on wood or MDF surfaces.
Using a brush or roller, apply an even coat of primer over all areas of your cabinets. Be sure to cover both sides of any removed doors as well. Allow the primer to dry completely according to manufacturer instructions before moving on.
Painting the cabinets with desired color or finish
Now comes the fun part—painting your mobile home cabinets with your desired color or finish. Choose a high-quality paint that is suitable for use on wood or MDF surfaces. Consider using a semi-gloss or satin finish, as these tend to be more durable and easier to clean.
Using a brush or roller, apply an even coat of paint to all surfaces of your cabinets. Start with the backside of any removed doors before moving on to the front side. Allow the first coat to dry completely before applying additional coats if needed. Follow the manufacturer’s instructions regarding drying times between coats.
Reattaching doors and hardware for a finished look
Once your cabinets are fully painted and dried, it’s time to reattach the doors and hardware for a finished look. Align the hinges with their corresponding holes on the cabinet frames and screw them back in place. Make sure they are securely fastened.
Next, attach any knobs or handles to the cabinet doors and drawers using screws or drills. Take care to align them properly and tighten them securely.
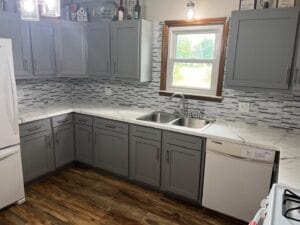
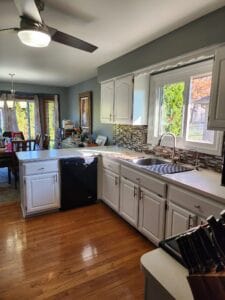
With everything reattached, step back and admire your freshly updated mobile home cabinets! The process may take some time and effort, but it will be well worth it when you see how much it transforms your space.
Remember, this step-by-step guide can help you update your mobile home cabinets easily and affordably.
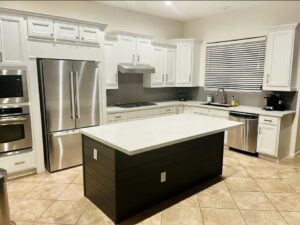
Techniques for Giving a Makeover to Mobile Home Cabinets
Mobile home cabinets can often be outdated or worn out, but with a little creativity and effort, you can transform them into stylish focal points in your kitchen. Here are some techniques to give your mobile home cabinets a much-needed makeover.
Adding decorative trim or molding to enhance cabinet appearance
One of the simplest yet most effective ways to elevate the look of your mobile home cabinets is by adding decorative trim or molding. This not only enhances the overall appearance but also adds depth and character to plain cabinet doors. You can choose from various styles of trim and molding, such as crown molding, rope molding, or even simple accent strips. By applying these elements strategically along the edges of your cabinet doors, you can instantly create a more sophisticated and customized look.
Using stencils or decals for unique designs on cabinet doors
If you’re looking for a way to make your mobile home kitchen cabinets stand out, consider using stencils or decals to add unique designs to the cabinet doors. Stencils allow you to create intricate patterns or motifs on the surface of the doors, while decals offer an easier alternative with pre-designed images or patterns. Whether you prefer floral designs, geometric shapes, or something more whimsical, stencils and decals provide endless possibilities for transforming your cabinets into eye-catching pieces.
Incorporating new handles or knobs for an updated look
Sometimes all it takes is a simple change in hardware to give your mobile home cabinets a fresh new look. Swapping out old handles or knobs with modern ones can instantly update their appearance and make them feel more current. Consider choosing handles or knobs that complement the overall style of your kitchen while adding a touch of personality. From sleek stainless steel options to vintage-inspired glass knobs, there’s an array of choices available that can enhance both functionality and aesthetics.
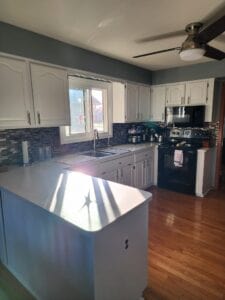
By utilizing these techniques for giving a makeover to mobile home cabinets – adding decorative trim or molding, using stencils or decals, and incorporating new handles or knobs – you can transform your kitchen’s cabinetry without breaking the bank. These simple yet effective home hacks allow you to create a personalized space that reflects your style and breathes new life into your cabinets.
So, don’t hesitate to explore the world of cabinet makeovers and unleash your creativity. With a little time and effort, you can turn dull cabinet doors into stunning focal points that will impress anyone who steps foot in your kitchen. Whether you choose to add decorative trim, experiment with stencils and decals, or update the hardware, these techniques will help you achieve a fresh and stylish look for your mobile home cabinets.
Tips for Painting Particle Board Cabinets in a Mobile Home
Particle board cabinets are a popular choice in many mobile homes due to their affordability and durability. However, over time, these cabinets can become worn out or outdated. If you’re looking to give your mobile home cabinets a fresh new look, painting them is a cost-effective and easy solution. Here are some tips to help you achieve professional-looking results when painting particle board cabinets.
Properly Cleaning and Degreasing Particle Board Surfaces Before Painting
Before you begin the painting process, it’s crucial to prepare the particle board surfaces properly. Start by removing any hardware such as handles or knobs from the cabinets. Next, thoroughly clean the surfaces using a mild detergent and warm water solution. This will help remove dirt, grease, and other residues that may interfere with paint adhesion.
Once cleaned, rinse the cabinets with clean water and allow them to dry completely before proceeding. It’s essential to ensure that there is no moisture left on the surface as this can affect paint application and adhesion.
Applying Multiple Thin Coats of Paint to Prevent Chipping or Peeling
To achieve a smooth and long-lasting finish on your particle board cabinets, it’s recommended to apply multiple thin coats of paint rather than one thick coat. This approach helps prevent chipping or peeling over time.
Start by applying a high-quality primer specifically designed for particle board surfaces. The primer will create a smooth base for the paint and improve its adhesion. Allow the primer to dry completely according to the manufacturer’s instructions before moving on.
Once the primer is dry, apply thin coats of your chosen paint color using a brush or roller. Avoid applying too much pressure while painting as this can cause uneven coverage or damage the particle board surface. Allow each coat of paint to dry fully before adding another layer.
Using High-Quality Primer Specifically Designed for Particle Board
Using a high-quality primer specifically designed for this type of surface is crucial. Particle board is porous and can absorb moisture if not properly sealed, leading to warping or swelling.
Look for a primer that is suitable for particle board and provides excellent adhesion. This will help seal the surface and create a smooth base for the paint. Consider using a primer with stain-blocking properties if your cabinets have any visible stains or discoloration.
By following these tips and taking the time to properly prepare your particle board cabinets before painting, you can achieve professional-looking results that will breathe new life into your mobile home’s interior. Remember to clean and degrease the surfaces thoroughly, apply multiple thin coats of paint, and use a high-quality primer specifically designed for particle board. With a little effort and creativity, you can transform your mobile home cabinets into stunning focal points that reflect your personal style.
Using oil-based enamel paint for repair and painting
Using the right type of paint is crucial. One popular option is oil-based enamel paint, which offers several advantages over other types of paints. We will address important considerations when working with oil-based paints.
Advantages of using oil-based enamel paint on mobile home cabinets
Oil-based enamel paint provides numerous benefits that make it an excellent choice for repairing and painting mobile home cabinets. Here are some key advantages:
Durability: Oil-based paints are known for their durability and ability to withstand wear and tear. When applied correctly, they can create a long-lasting finish that resists chipping, cracking, and peeling.
Smooth finish: The high viscosity of oil-based enamel paint allows it to level out evenly on surfaces, resulting in a smooth and professional-looking finish. This is particularly beneficial when working with cabinets that have visible imperfections or damage.
Stain resistance: Oil-based paints offer superior stain resistance compared to latex paints. This makes them ideal for kitchen cabinets that may come into contact with food spills or other substances that could leave stubborn stains.
Easy to clean: Cabinets painted with oil-based enamel can be easily cleaned without damaging the finish. Simply wipe away dirt or grime using a damp cloth or mild cleaning solution.
How to properly apply oil-based enamel paint
To achieve the best results when using oil-based enamel paint on your mobile home cabinets, follow these steps:
Preparation: Start by removing any existing coatings from the cabinet surface using sandpaper or a chemical stripper if necessary. Clean the cabinets thoroughly to remove any dust or grease buildup.
Sanding: Lightly sand the cabinets to create a rough surface that allows the paint to adhere better. Focus on areas with existing damage or imperfections.
Priming: Apply a coat of oil-based primer to the cabinets. This step helps seal the wood and provides a solid base for the paint to adhere to. Allow the primer to dry completely according to the manufacturer’s instructions.
Painting: Using a high-quality brush or roller, apply thin, even coats of oil-based enamel paint to the cabinet surfaces. Start from one corner and work your way across, ensuring complete coverage. Allow each coat to dry before applying additional coats.
Finishing touches: Once you are satisfied with the color and coverage, let the final coat of paint dry thoroughly. Consider applying a clear varnish or topcoat for added protection and shine.
Considerations when working with oil-based paints
While oil-based enamel paint offers many advantages, there are some important considerations to keep in mind:
Ventilation: Oil-based paints emit strong fumes during application and drying. Ensure proper ventilation by opening windows or using fans in the workspace.
Cleanup: Cleaning brushes or rollers used with oil-based paints requires mineral spirits or turpentine instead of water typically used for latex paints.
Drying time: Oil-based paints have longer drying times compared to latex paints.
Polyurethane based paints for mobile home cabinet repair
Polyurethane based paints offer numerous benefits. Not only do they provide a durable finish, but they also enhance the overall appearance of the cabinetry.
Benefits of using polyurethane based paints on cabinetry
Polyurethane based paints are specifically designed to withstand the wear and tear that mobile home cabinets often endure. Here are some key benefits of utilizing these paints:
Durability: Polyurethane is known for its exceptional durability, making it an ideal choice for cabinet surfaces. It forms a strong protective layer that can resist scratches, stains, and chipping.
Versatility: These paints can be used on various types of cabinet materials such as melamine, thermofoil, vinyl, and pressure laminate. This versatility allows you to transform cabinets made from different materials with ease.
Smooth Finish: Polyurethane based paints create a smooth and flawless finish on cabinetry surfaces. They have excellent leveling properties that help eliminate brush or roller marks, resulting in a professional-looking outcome.
Color Retention: Mobile homes are often exposed to sunlight which can cause color fading over time. However, polyurethane based paints have excellent color retention properties that prevent premature fading and discoloration.
Steps involved in applying polyurethane based paints
To achieve the best results when using polyurethane based paints for mobile home cabinet repair, follow these steps:
Preparation: Start by removing all hardware from the cabinets such as handles and hinges. Clean the surfaces thoroughly with a mild detergent to remove any grease or dirt buildup.
Sanding: Lightly sand the cabinet surfaces to create a rough texture, which helps the paint adhere better. Use fine-grit sandpaper and make sure to remove any dust particles before proceeding.
Priming: Apply a primer specifically designed for the type of material your cabinets are made from. This step ensures proper adhesion and enhances the durability of the paint.
Paint Application: Use a high-quality brush or roller to apply polyurethane based paint evenly on the cabinet surfaces. Start with thin coats and allow each layer to dry completely before applying the next one.
Curing: Once you have completed painting all surfaces, allow the cabinets to cure for at least 24 hours before reinstalling hardware or using them again. This curing time ensures that the paint fully hardens and provides optimal durability.
Achieving a durable finish with polyurethane based paints
To ensure a long-lasting finish when using polyurethane based paints on mobile home cabinets, consider these tips:
Avoid heavy scrubbing or abrasive cleaners that can damage the painted surface.
Regularly clean the cabinets with mild soap and water to maintain their appearance.
Use felt pads or bumpers on cabinet doors and drawers to prevent scratching.
Consider adding a clear topcoat of polyurethane for additional protection against daily wear and tear.
Painting laminate cabinets with chalk paint: Ace Hardware guide
Chalk paint is a versatile and popular choice for giving a fresh look to various surfaces, including laminate cabinets. Unlike traditional paints, chalk paint adheres well to laminate material, creating a durable and attractive finish. In this guide, we will walk you through the step-by-step process of using chalk paint on laminate surfaces, along with some helpful tips and tricks specifically tailored to painting laminate cabinets.
Why chalk paint is suitable for laminate cabinets: Revamp Mobile Home Cabinets
Laminate cabinets are known for their smooth and glossy finish, which can make it challenging for regular paint to adhere properly. However, chalk paint is specially formulated to bond well with different surfaces, including laminate. Its unique composition allows it to stick effectively even without extensive priming or sanding.
One of the advantages of using chalk paint on laminate cabinets is its ability to create a matte and slightly textured appearance. This can help in hiding any imperfections or scratches that may be present on the surface of the cabinets. Chalk paint offers a wide range of color options, allowing you to choose from various shades that suit your style and preferences.
Step-by-step instructions on how to use chalk paint on laminate surfaces
Preparation: Begin by removing all hardware from the cabinet doors such as handles or knobs. Clean the surface thoroughly using a mild detergent solution or degreaser to remove any dirt or grease buildup.
Lightly sand: While chalk paint does not require extensive sanding like traditional paints, it’s still beneficial to lightly sand the surface using fine-grit sandpaper. This helps in creating better adhesion between the paint and the cabinet surface.
Priming (optional): Although not necessary when using chalk paint, applying a primer designed for laminates can provide additional durability and improve coverage.
Apply the first coat: Start by applying an even coat of chalk paint using a brush or roller. Make sure to follow the wood grain or direction of the surface for a smoother finish.
Allow drying time: Let the first coat dry completely according to the manufacturer’s instructions. This typically takes around 1-2 hours, but it’s essential to check the specific guidelines provided with your chosen brand of chalk paint.
Apply additional coats: Depending on the desired level of coverage and color intensity, apply additional coats of chalk paint following the same technique as before. Allow each coat to dry completely before applying another layer.
Sealing (optional): To enhance durability and protect the painted surface, consider applying a clear wax or polyurethane sealant designed for chalk-painted surfaces. This step is particularly useful for high-traffic areas such as kitchen cabinets.
Tips and tricks specific to painting laminate cabinets with chalk paint
Use a high-quality synthetic bristle brush or foam roller for smooth application.
Apply thin coats of chalk paint rather than thick layers to avoid drips and uneven drying.
Consider adding decorative effects like distressing or antiquing techniques for a unique look.
Experiment with different colors and finishes to achieve your desired aesthetic.
Avoid excessive scrubbing or harsh cleaning agents after painting to maintain the integrity of the finish.
You might also be interested in our articles:
Ready to Assemble Kitchen Cabinets
Ready to Assemble Bathroom Cabinets
Conclusion: Revamp Mobile Home Cabinets
In conclusion, it is important to choose the right primers and paints for a successful makeover.
Using oil-based enamel paint can provide durability and a smooth finish, making it an excellent choice for cabinet repair. Polyurethane-based paints are another great option as they offer resistance to wear and tear.
If you’re looking to update particle board cabinets in your mobile home, follow the tips provided in our previous section to ensure a long-lasting and professional-looking result.
For those interested in a unique look, painting laminate cabinets with chalk paint can be a fun project. Ace Hardware provides a helpful guide on how to achieve this desired effect.
Remember that proper preparation is key before starting any painting project. Make sure to clean the cabinets thoroughly and sand them if necessary for better adhesion of the primer and paint.
To ensure success with your mobile home cabinet repair and painting project, consider following these recommendations for primers and paints. With the right materials and techniques, you can transform your kitchen cabinets into beautiful focal points in your home.
So why wait? Get started on updating your mobile home cabinets today!
FAQs: Revamp Mobile Home Cabinets
Can I use regular interior paint for my mobile home cabinets?
While regular interior paint may work temporarily, it is not recommended for long-term durability on cabinets. It’s best to use specific primers and paints designed for kitchen cabinet repair.
How long does it take for the painted cabinets to dry completely?
The drying time will depend on several factors such as humidity levels, ventilation, type of paint used, etc. Generally, allow at least 24-48 hours for the painted cabinets to dry completely before using them again.
Do I need to sand my laminate cabinets before painting them with chalk paint?
In most cases, sanding is not required when using chalk paint on laminate cabinets. However, it’s always a good idea to lightly sand the surface for better paint adhesion and longevity.
Can I use latex paint instead of oil-based enamel paint for my cabinet repair?
While latex paint is an option, oil-based enamel paint tends to provide better durability and a smoother finish, making it a preferred choice for kitchen cabinet repair.
Are there any alternative paints to consider besides polyurethane-based paints?
Yes, there are other options available such as acrylic or water-based paints. However, polyurethane-based paints are known for their excellent resistance to wear and tear, making them highly suitable for mobile home cabinet repair.
You might be interested in these articles below:
Spray Painting Mobile Home Siding: A Step-by-Step Guide