
Mobile Home Belly Wrap: Repair and Installation Guide
Damage signs, material thickness, and a step-by-step repair for the underbelly of a manufactured home.
The belly wrap, also called the underbelly or bottom board, is the sheet that seals the underside of a manufactured home. It protects insulation, ductwork, and plumbing from moisture, pests, and road debris. When it fails, the problems go well beyond a torn piece of plastic. This guide covers how to spot damage, what materials to use, and how to do the repair correctly.
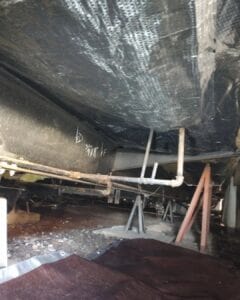
What the Belly Wrap Actually Does
The belly wrap is a continuous sheet stapled to the bottom of the floor joists, enclosing the insulation, ductwork, and plumbing that run through the underfloor cavity. It does three main jobs:
- Keeps insulation in place. The fiberglass batts between floor joists would sag, fall out, or get waterlogged without the belly wrap holding them against the subfloor from below. Damaged belly wrap means failing insulation and rising energy bills.
- Blocks moisture from the ground. Ground moisture rises as vapor and collects in the underfloor cavity if it isn’t blocked. That leads to mold in the insulation, rot in the particle board subfloor, and soft spots in the floor above.
- Keeps pests out. Tears in the belly wrap are one of the most common ways rodents and insects get into a mobile home. A compromised belly wrap is an open door for any creature looking for a warm, insulated place to nest.
Once belly wrap tears, moisture gets into the insulation cavity. Wet fiberglass loses most of its insulating value, mold can start within days in warm weather, and the particle board subfloor starts absorbing moisture from below. A small repair done promptly costs a fraction of what a floor replacement costs after months of ignored water damage. Don’t put this one off.
Signs Your Belly Wrap Needs Attention
Under-Home Visual Signs
- Sagging or drooping sections
- Visible tears, holes, or punctures
- Insulation hanging down or missing
- Discolored or water-stained areas
- Material pulling away from the frame
- Evidence of rodent chewing
Interior Warning Signs
- Cold floors in winter (insulation is wet or missing)
- Soft or spongy spots in the floor (subfloor moisture damage)
- Musty smell, especially near floor level
- Noticeably higher heating and cooling bills
- Signs of rodent activity inside the home
- Visible mold along baseboards
If you have a water leak under the home, fix it completely before any belly wrap repair. New material installed over an active moisture source will fail again quickly.
Materials and Thickness Guide
The most important decision in a belly wrap repair is the material thickness. Belly wrap is measured in mils (thousandths of an inch). Thicker is more durable but less flexible; thinner is easier to work with but fails faster.
| Thickness | Use Case | Durability | Notes |
|---|---|---|---|
| 6 mil | Emergency / temporary patches only | Poor | Tears easily; not recommended for full replacement |
| 8–10 mil | Standard replacement on protected sites | Good | Adequate for homes with good underpinning and no ground contact |
| 12–16 mil | Recommended for most mobile home belly wrap replacement | Very good | Best balance of durability and workability; use this for any full replacement |
| 20 mil | High-exposure sites, previous pest damage, coastal areas | Excellent | Heaviest duty; harder to work with under the home |
Standard housewrap (Tyvek, etc.) is designed for walls. It’s lightweight, breathable, and not built to handle the mechanical stress of an underbelly. Mobile home belly wrap is a heavier-duty material made for puncture resistance, ground-level exposure, and the flex that comes with the home moving over time. Using housewrap as a belly wrap substitute leads to early failure.
Insulation: Replace It Too If Damaged
If your belly wrap has been compromised for any length of time, the insulation inside is very likely wet, compressed, or missing. Wet fiberglass batts should be replaced; they don’t dry out and recover their R-value. The U.S. Department of Energy recommends a minimum of R-11 for mobile home underbelly insulation, with R-19 preferred for cold climates. For a full guide to insulation options under a manufactured home, see the Insulation Under a Mobile Home guide.
Where to Buy Mobile Home Belly Wrap
This is one of the most common questions. The honest answer is that most home improvement stores, including Home Depot and Lowe’s, don’t reliably stock belly wrap in the right thickness and width for a manufactured home. When they do have it, selection is limited and it’s often the thinner utility poly that won’t hold up. Ordering online is usually the most practical option: you can pick the right thickness and width and have it delivered.
As an Amazon Associate I earn from qualifying purchases.
Heavy-Duty Belly Wrap Plastic (6 to 20 Mil)
Typical price: $150–$500
Heavy-duty polyethylene made for mobile home underbelly use. Available in 6–20 mil thickness options, white for easy inspection. Coverage depends on the roll size you choose.
View on AmazonButyl Seaming Tape
Typical price: $25–$85
Butyl adhesive tape for belly wrap seams. Standard duct tape fails in the temperature swings and moisture of an underbelly. Butyl tape makes a weatherproof, long-lasting seal. It can be hard to find at local stores in the right spec.
View on AmazonUnderbelly Insulation: Fiberglass Batts
Typical price: $75–$300
R-11 to R-19 fiberglass batts with kraft facing. If your belly wrap has been compromised, the insulation behind it usually needs to be replaced at the same time. Fits standard mobile home joist spacing. The kraft facing goes up toward the subfloor.
View on AmazonHeavy-Duty Staple Gun
Typical price: $45–$150
A good staple gun makes belly wrap installation faster and more reliable. You’ll be working on your back under the home, so a comfortable trigger-operated gun saves a lot of effort. Use stainless steel staples rated for exterior use so they don’t rust and loosen over time.
View on AmazonEmergency Patch Kit
Typical price: $15–$45
Self-adhesive patches for temporary belly wrap repairs. If you’ve found damage and are waiting for full replacement materials, patches buy time and help prevent more moisture damage to the insulation. Not a permanent fix; follow up with a full repair.
View on AmazonStep-by-Step Installation
-
Assess the Damage and Address Root Causes First
Before removing old material, figure out what caused the failure: rodent damage, road debris, a plumbing leak, or age. Any active water leak must be repaired before new belly wrap goes up. Any structural issues with piers or blocking should be addressed while you have clear access from below. Take photos of the damage before clearing anything away.
-
Remove All Damaged Material
Pull down the torn or sagging belly wrap sections completely. Remove any insulation that is wet, compressed, discolored, or shows mold. Wet fiberglass that smells musty should be bagged right away; don’t leave it under the home. Clear debris out of the joist cavity before installing new insulation.
-
Install Replacement Insulation
Cut new fiberglass batts to fit between the joists. The vapor-retarder facing (kraft paper side) goes up, facing the subfloor above. That keeps warm, moist air from inside the home from condensing inside the insulation. Press the batts firmly into the joist cavity so there are no gaps at the edges. The belly wrap installed next holds them in place.
-
Cut and Position the Belly Wrap
Unroll the new belly wrap along the length of the repair area. For a full replacement, start at one end of the home and work toward the other. Cut sections to manageable lengths; a full roll of 20-mil across the width of a double-wide is very heavy and hard to position on your back. Work in sections 8–10 feet long and overlap each section by at least 6 inches.
-
Staple to the Joists Every 6 to 8 Inches
Pull the belly wrap snug and staple it to the bottom of each floor joist every 6–8 inches. It should be snug but not over-tight; a little slack is fine. Over-tensioning makes it more likely to tear at the staple points. Stainless steel staples won’t rust through over time.
-
Seal All Seams and Penetrations with Butyl Tape
Every seam where two sections overlap should be sealed with butyl tape along its full length. Every penetration, where pipes, electrical conduit, or ductwork pass through, should be sealed around the edge. Open penetrations are where moisture, pests, and conditioned air get through. This step is what separates a long-lasting repair from one that fails again within a year.
-
Final Inspection
Walk the full length of the repair and check every seam, staple line, and penetration seal. Look for areas where the material sags noticeably and add staples if needed. A properly installed belly wrap should be snug, continuous, and sealed at every edge and opening. No daylight should show through any seam.
Common Mistakes to Avoid
Using 6-Mil Plastic for the Full Job
6-mil poly is for temporary patches only. Under a mobile home it gets punctured, scuffed, and torn within months. Use 12–16 mil minimum for any permanent replacement.
Skipping Seam Tape
Overlapping without taping leaves gaps where moisture and pests get in. Sealing every seam and penetration with butyl tape is a step DIYers often skip, and a common reason repairs fail.
Installing Over Damaged Structure
New belly wrap installed over a damaged or wet subfloor, an active leak, or a pest infestation traps the problem inside. Fix the cause first, always.
Leaving Wet Insulation in Place
Wet fiberglass has almost no R-value and is a mold source. Remove and replace it; don’t seal it back up wet. New belly wrap won’t save old damaged insulation.
Would You Rather Sell Than Repair?
If a torn belly wrap has already led to soft floors, mold, or subfloor rot, selling the home as-is is one option to compare against the repair bill. I buy mobile homes that need work, and you don’t have to fix anything first.
Frequently Asked Questions
What is mobile home belly wrap made of?
Belly wrap is heavy-duty plastic sheeting, usually polyethylene, made to a heavier spec than ordinary construction poly for underbelly use. It’s typically white on the visible side for easy inspection. Most manufactured home belly wrap runs 8–20 mil thick.
Where can I buy belly wrap for a mobile home?
Belly wrap in the right thickness and width is rarely stocked consistently at local home improvement stores. Online retailers are usually the most reliable source: you can choose the exact mil thickness and roll width and have it shipped to you instead of hunting through several stores for a specialty item they may not carry.
Can I repair belly wrap myself?
Yes. Belly wrap repair is a realistic DIY project for most homeowners. The main requirements are a willingness to work on your back under the home, the right materials (12–16 mil minimum), a heavy-duty staple gun, and butyl seaming tape. Access is often easier than in a typical site-built crawl space because a manufactured home sits on piers with open space underneath. If you find major structural problems during the repair, it’s worth bringing in a professional.
How long does mobile home belly wrap last?
Quality 12–16 mil belly wrap installed correctly with sealed seams should last many years under normal conditions. Things that shorten its life include rodent activity, road debris from moving the home, standing water under the home, and vegetation touching the underbelly. A yearly visual check catches early damage before it turns into a full replacement.
Should I do crawl space encapsulation instead of just replacing the belly wrap?
Belly wrap replacement and crawl space encapsulation address different things. Belly wrap seals the underside of the home itself: insulation, joists, pipes, and ducts. A crawl space vapor barrier lies on the ground beneath the home to block soil moisture from rising. Crawl space encapsulation combines the vapor barrier with sealing the perimeter and any vents for fuller moisture control. Doing both belly wrap and a vapor barrier gives the most complete protection. See the Crawl Space Encapsulation guide for the full picture.